FAQs
How can I add a transaction entry?
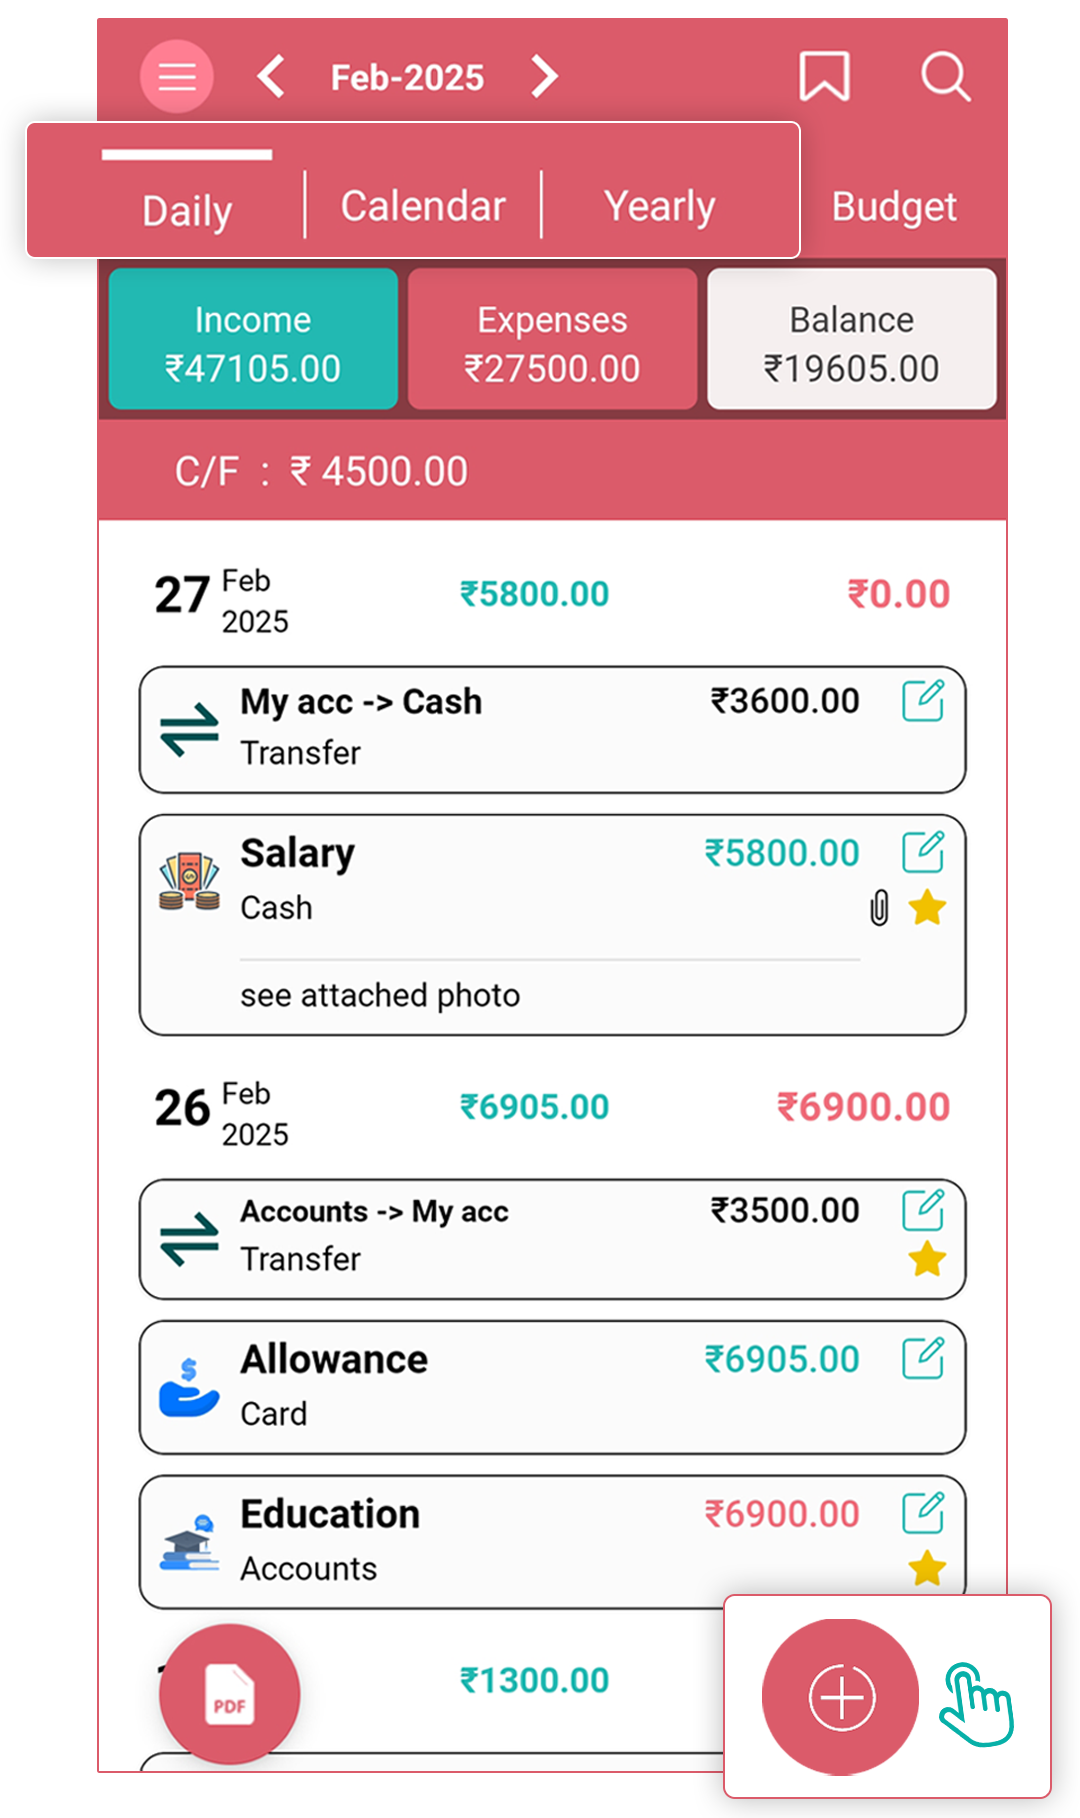
You can add Income, Expense, or Transfer entries from the Daily, Calendar, and Yearly tabs.
- Daily Tab / Yearly Tab: Tap the "+" (plus) button to add a new transaction.
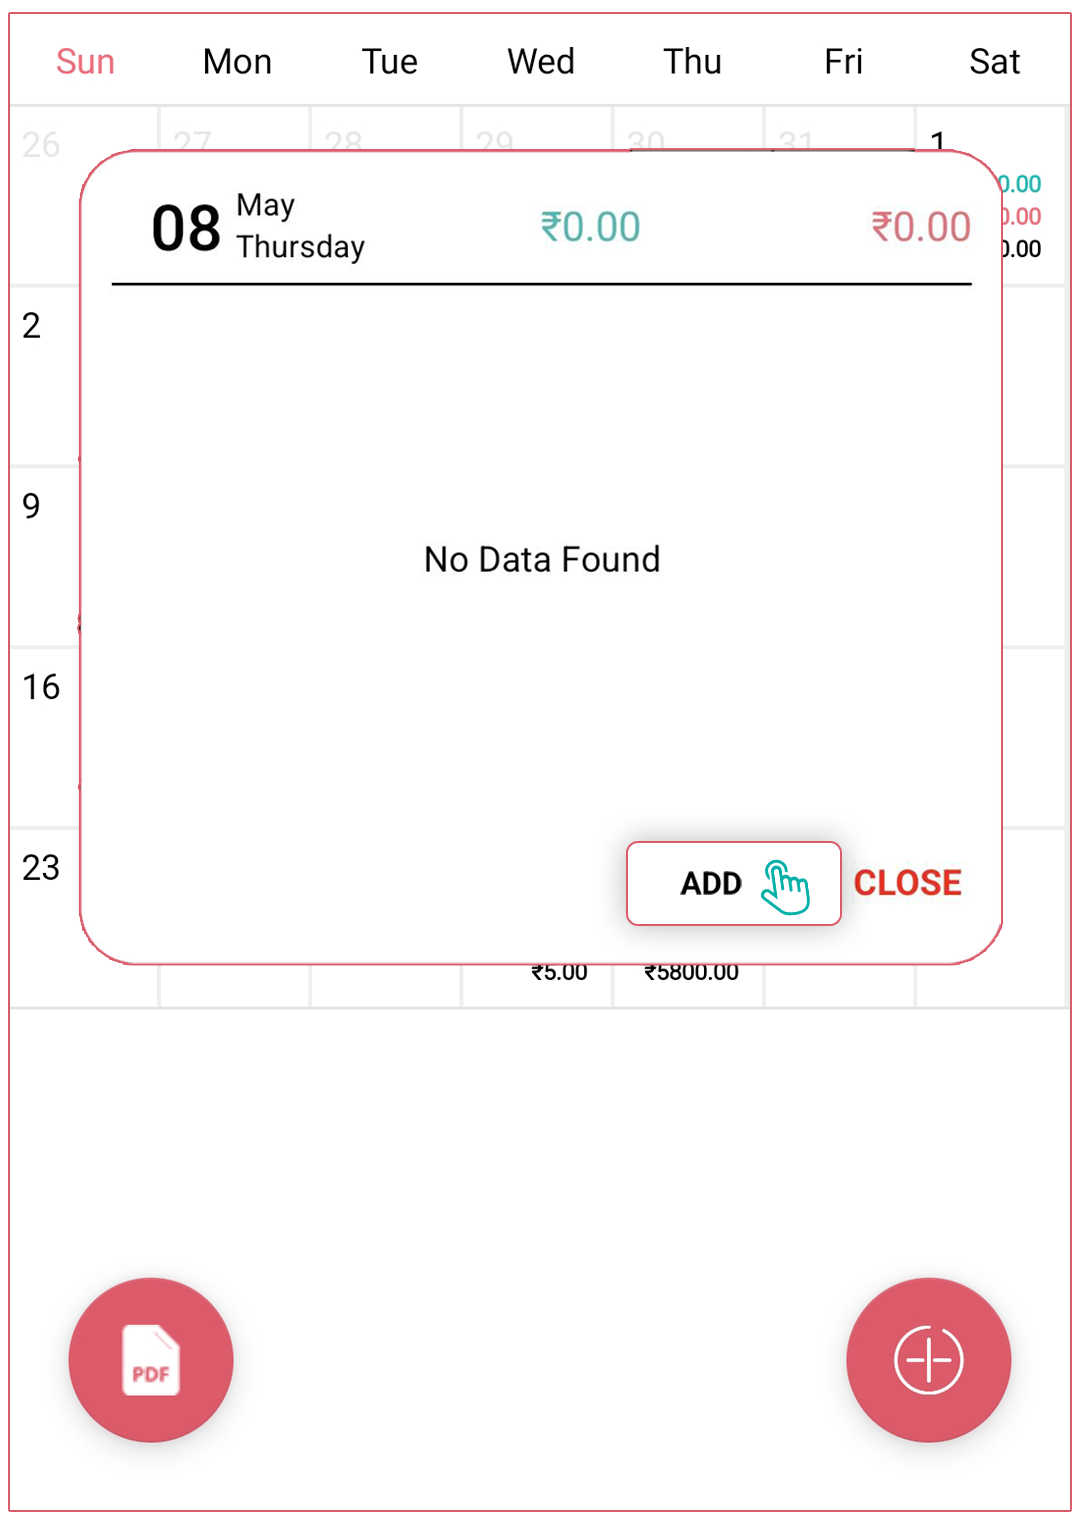
- Calendar Tab:
- Select the date you want to add a transaction for.
- A pop-up will appear—tap the "Add" button to proceed.
- Alternatively, you can use the "+" (plus) button at the bottom of the calendar screen.
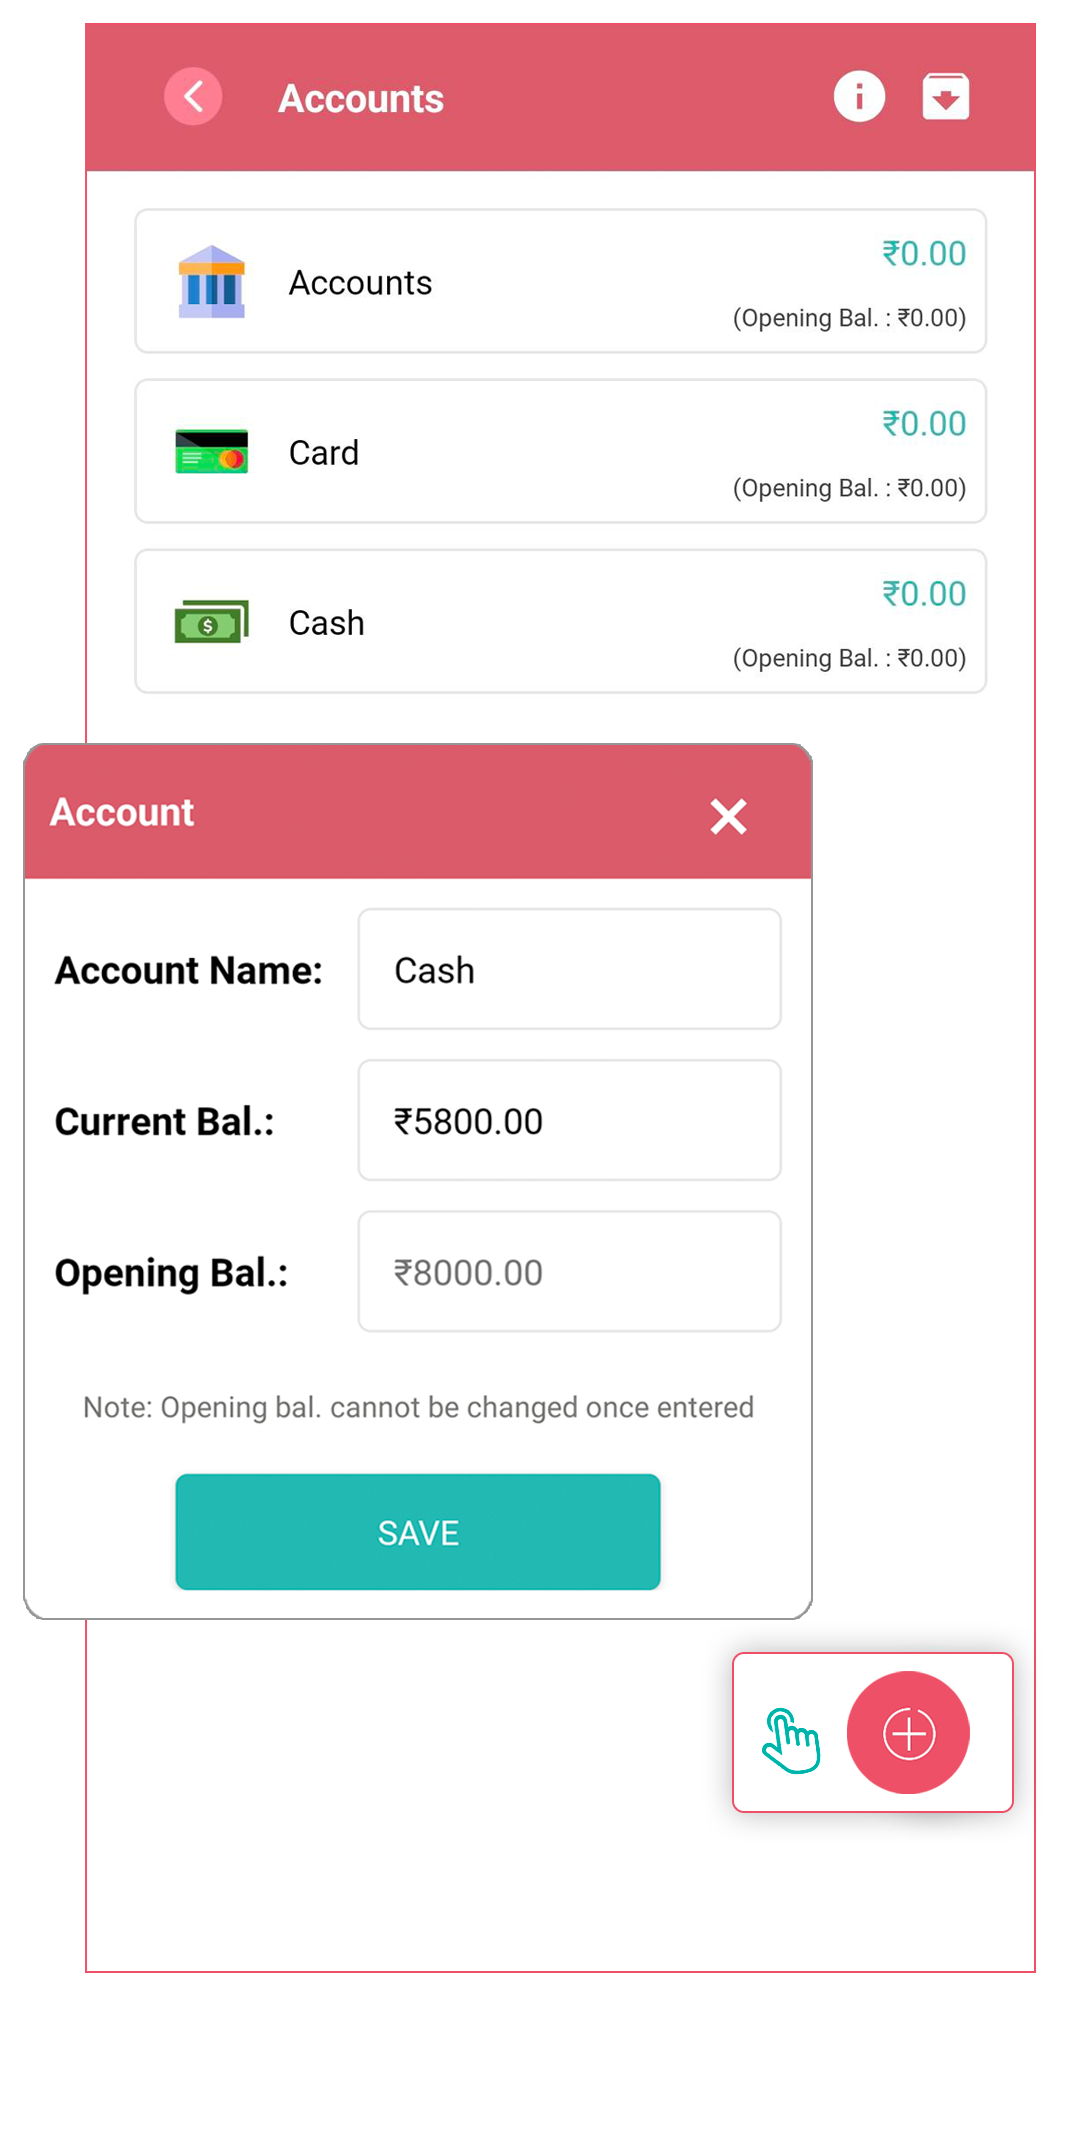
How can I set an opening balance or change the current balance of the account?
For setting an opening balance:
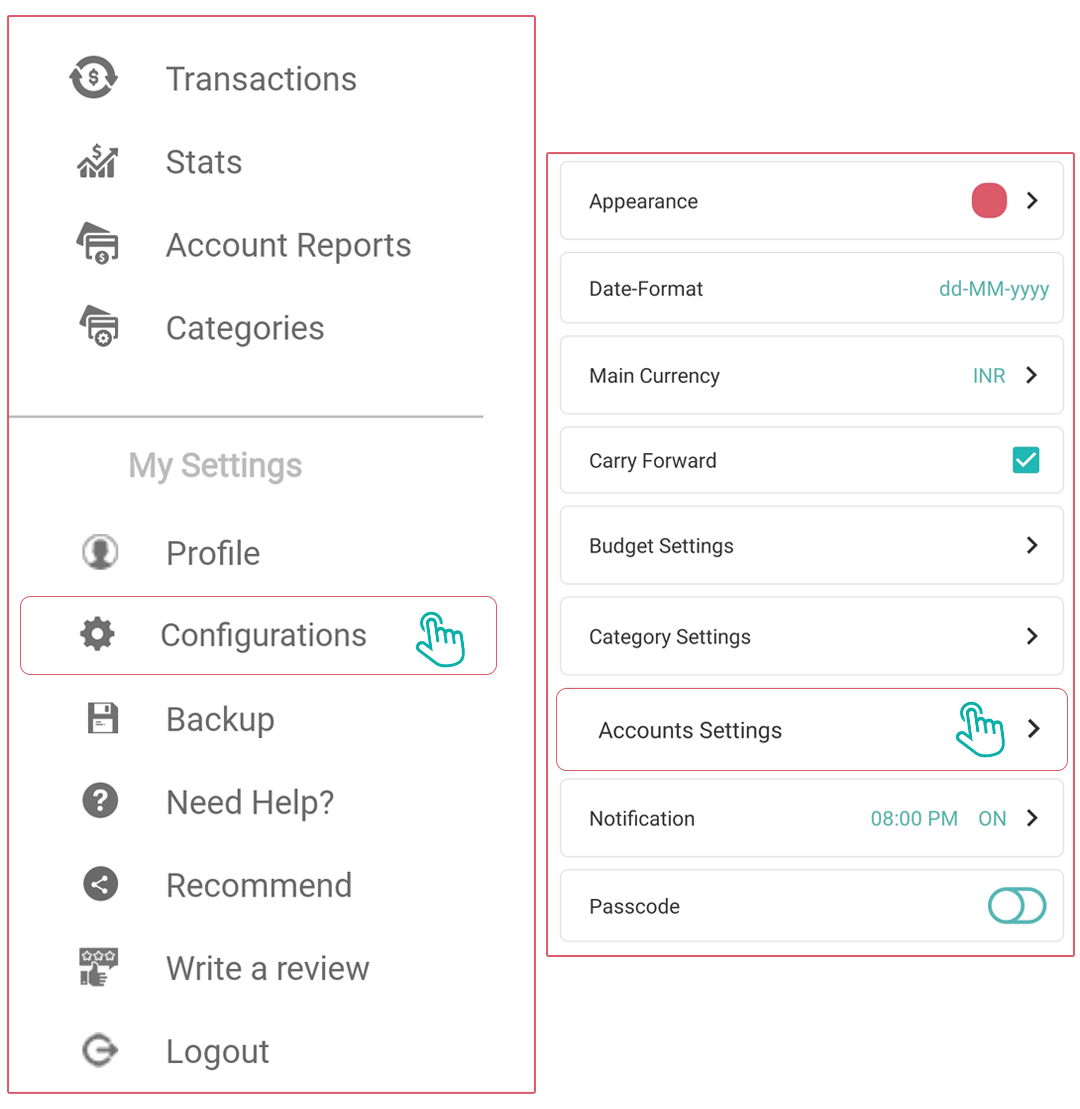
- Navigate to the Side Panel > Configurations > Account Settings.
- Select the account you want to set an opening balance for (or create a new account)
- Look for an "Opening Balance” option
- Enter the opening balance amount
- Save your changes
- Opening Balance cannot be changed once entered.
For changing the current balance:
- Navigate to the Side Panel > Configurations > Account Settings.
- Tap on the account whose balance you want to update
- Look for an "Edit Account" option
- Enter the new balance amount
- Save the changes
- Current balance can be changed anytime.
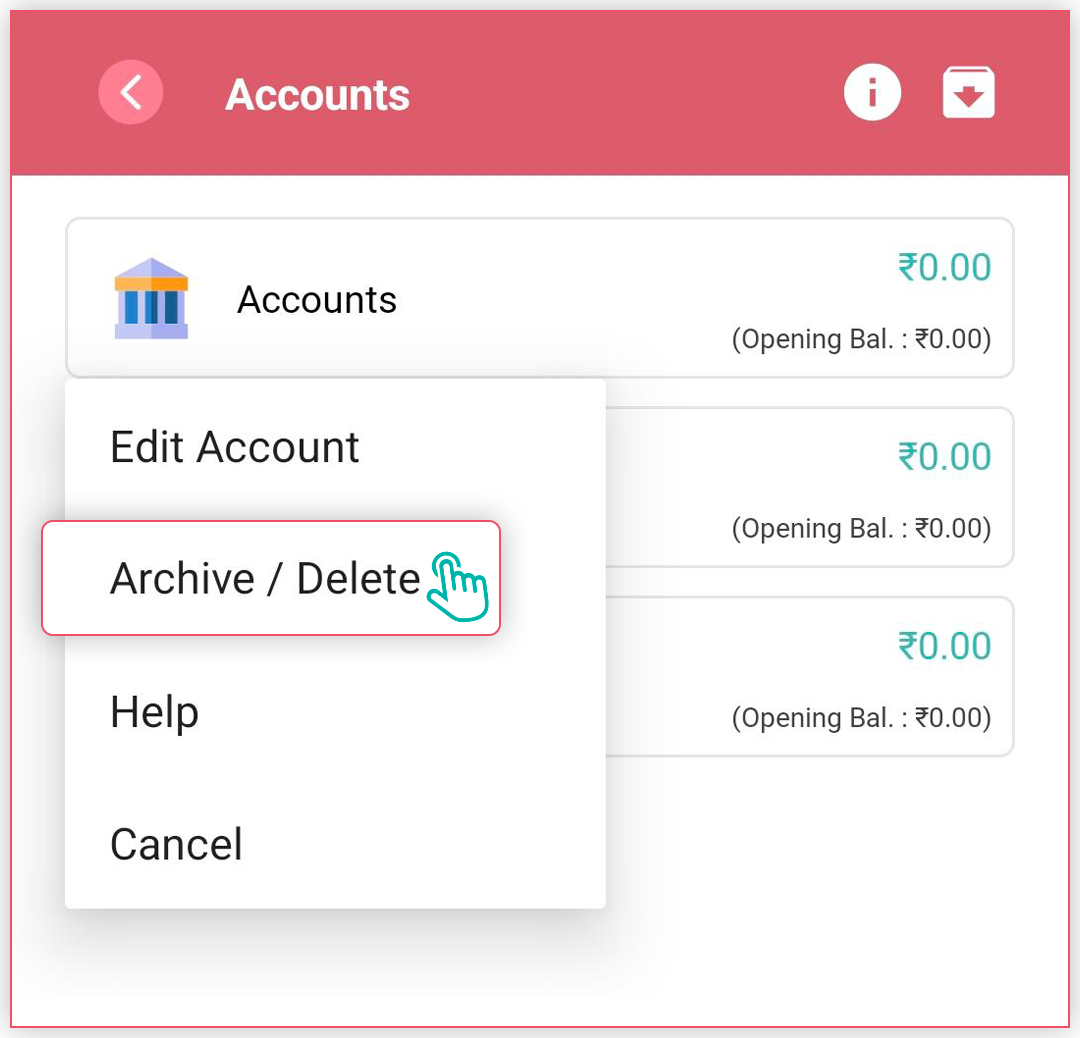
How can I delete/archive/unarchive accounts?
For deleting accounts:
- Navigate to the “configurations > Account Settings” section
- Find and tap the account you want to delete
- Look for an "Archive/Delete" option
- Confirm the deletion when prompted (This will delete the account as well as its transactions.)
For archiving accounts:
- Select the account you want to archive
- Look for an "Archive/Delete" option
- Confirm that you want to archive the account
- The account should now be moved to an archived state (hidden for future entries, but existing data will not be deleted)

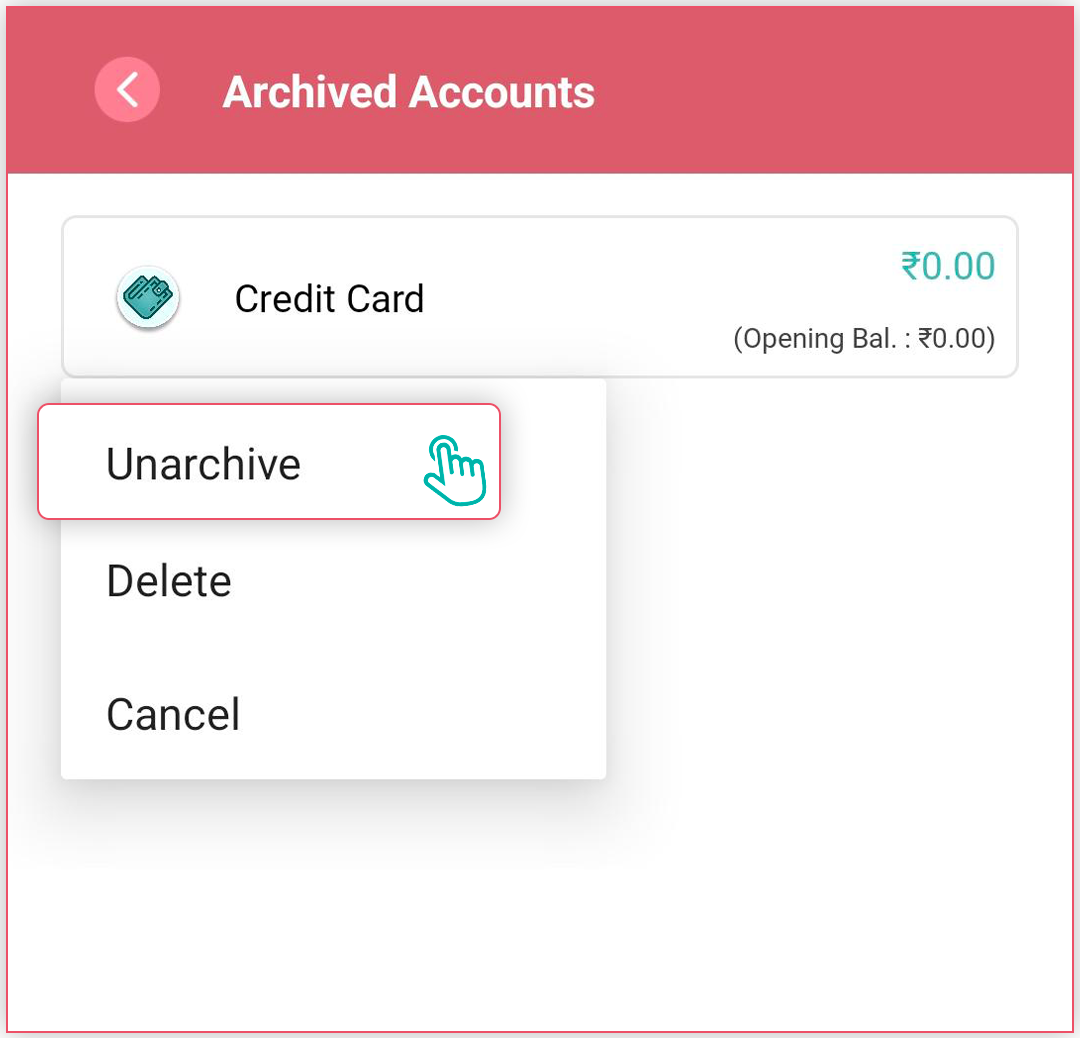
For unarchiving accounts:
- Navigate to the “configurations > Account Settings” section
- Look for an "Archived" tab at the top right corner of the navigation bar.
- Find the archived account you want to restore
- Select the "Unarchive" option
- The account should now be returned to your active accounts list
How can I add/edit/Sort Categories?
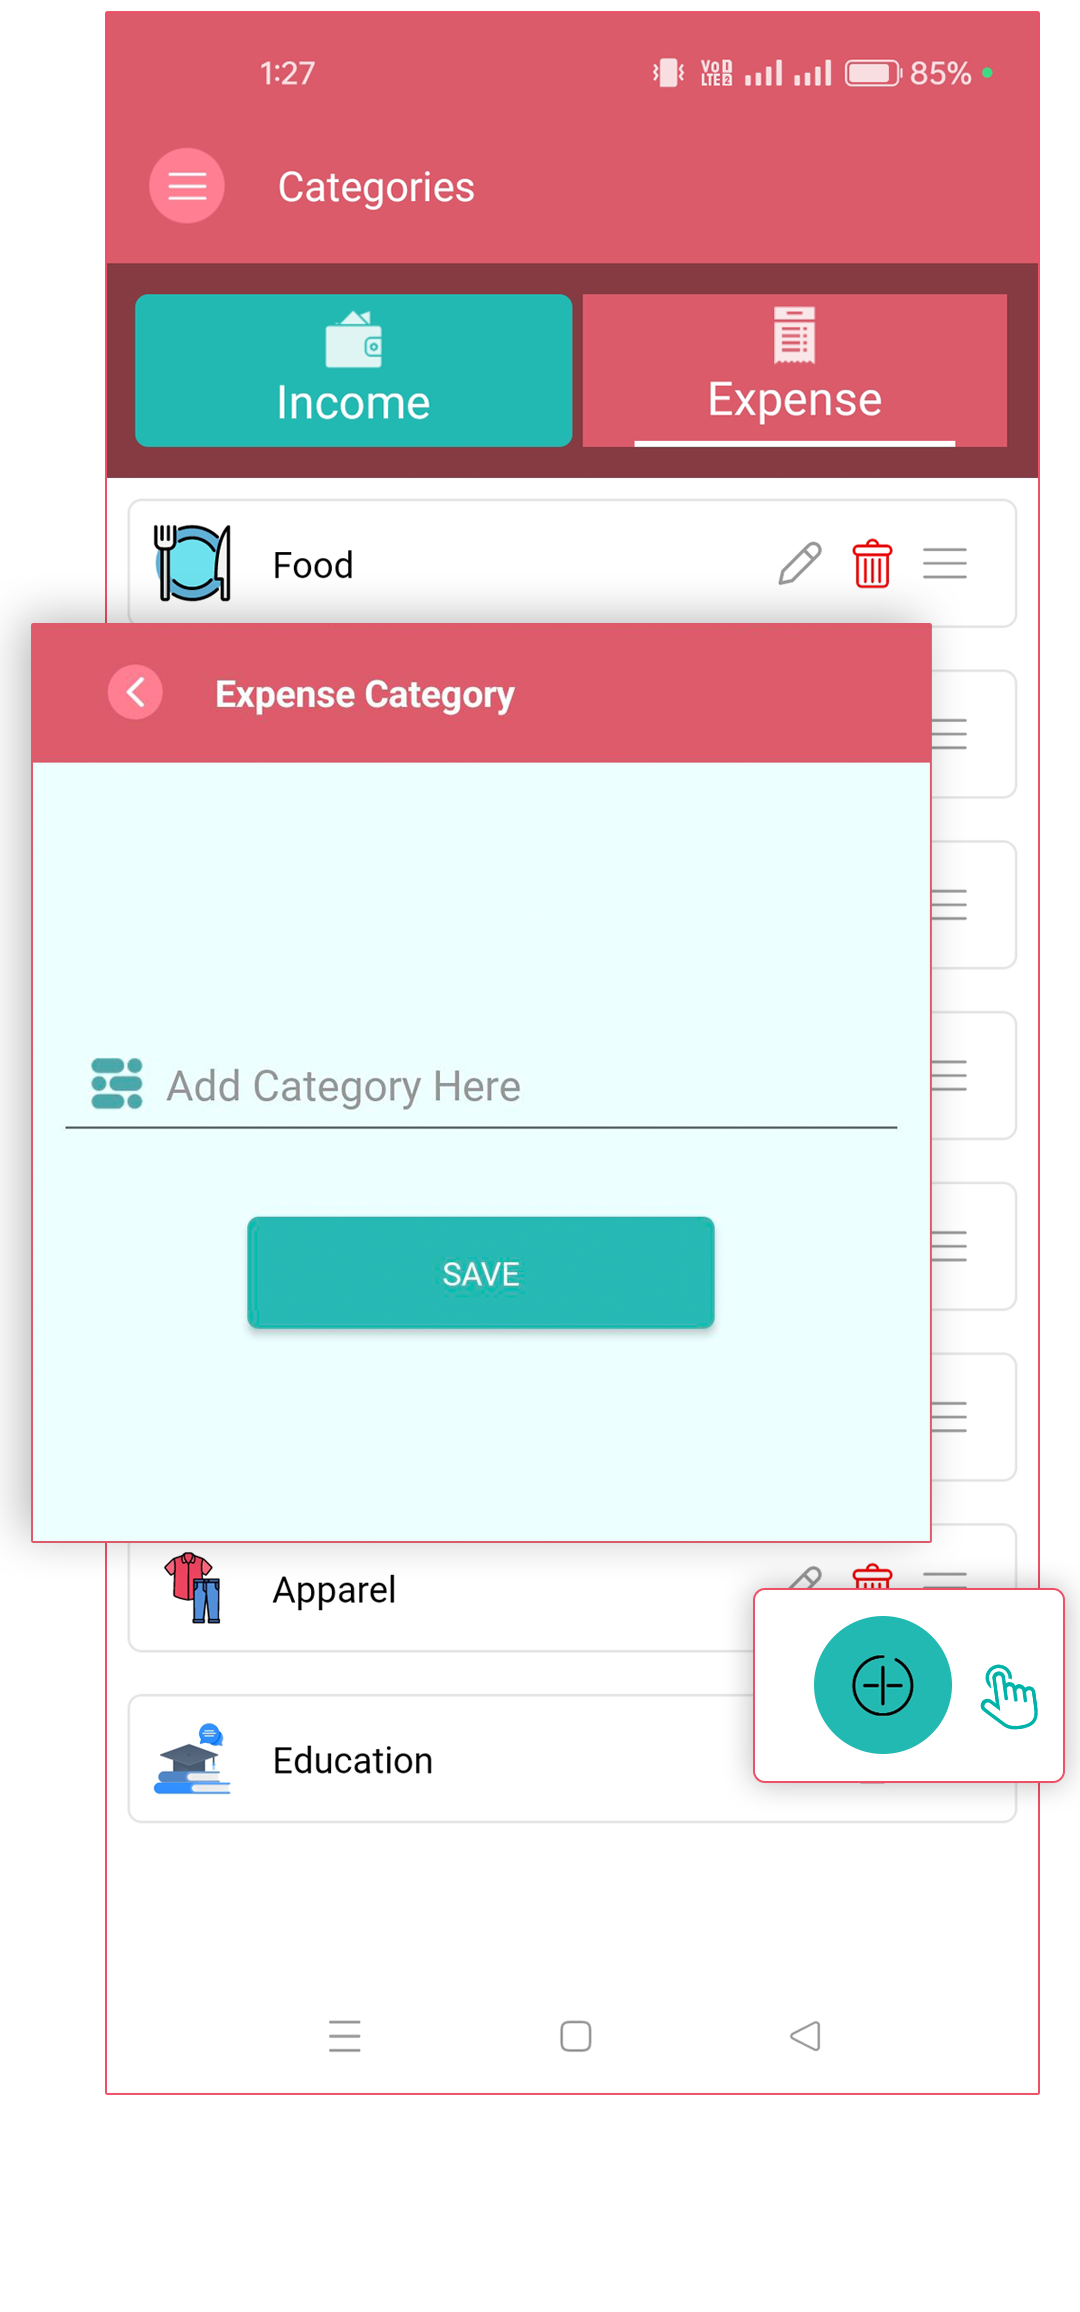
For adding categories:
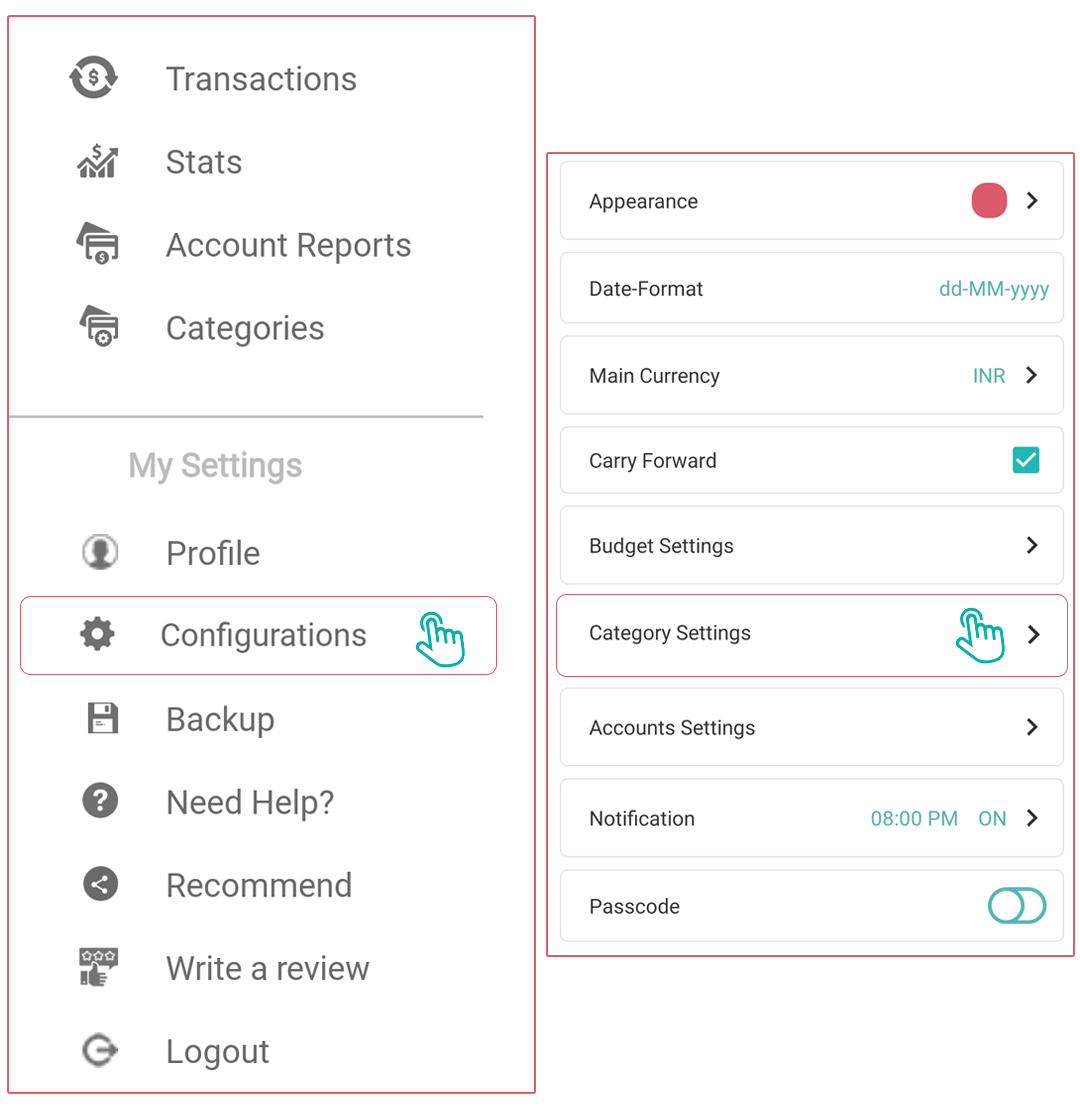
- Navigate to the Side Panel > Categories or Side Panel > Configurations > Category Settings.
- an “+" button at the bottom to create a new category
- Enter the category name
- Save the new category
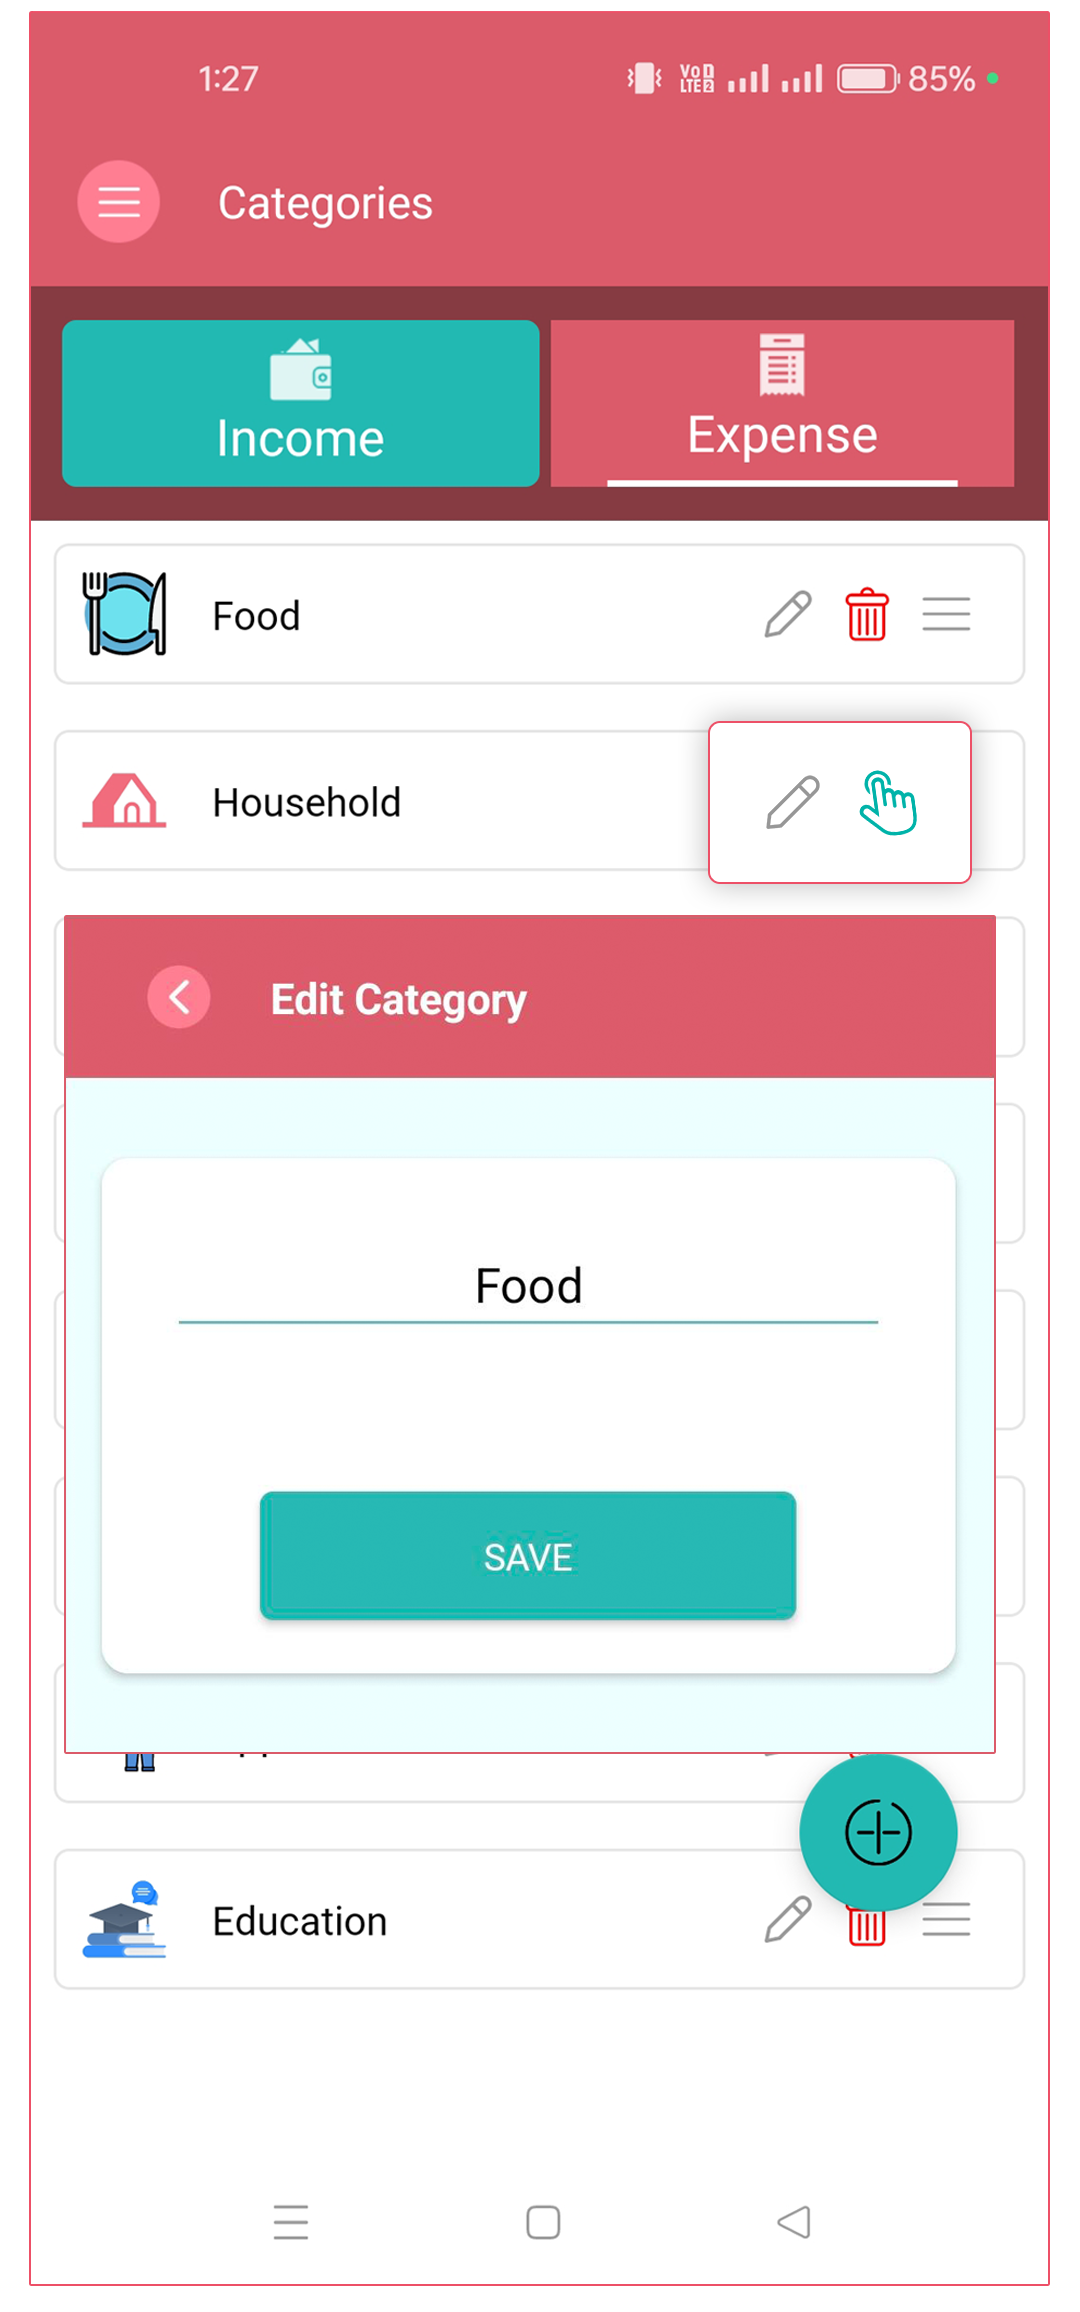
For editing categories:
- to the Categories section
- Find and select the category you want to edit
- Look for an "Edit" option (Pencil icon)
- Make your changes to the name.
- Save your modifications
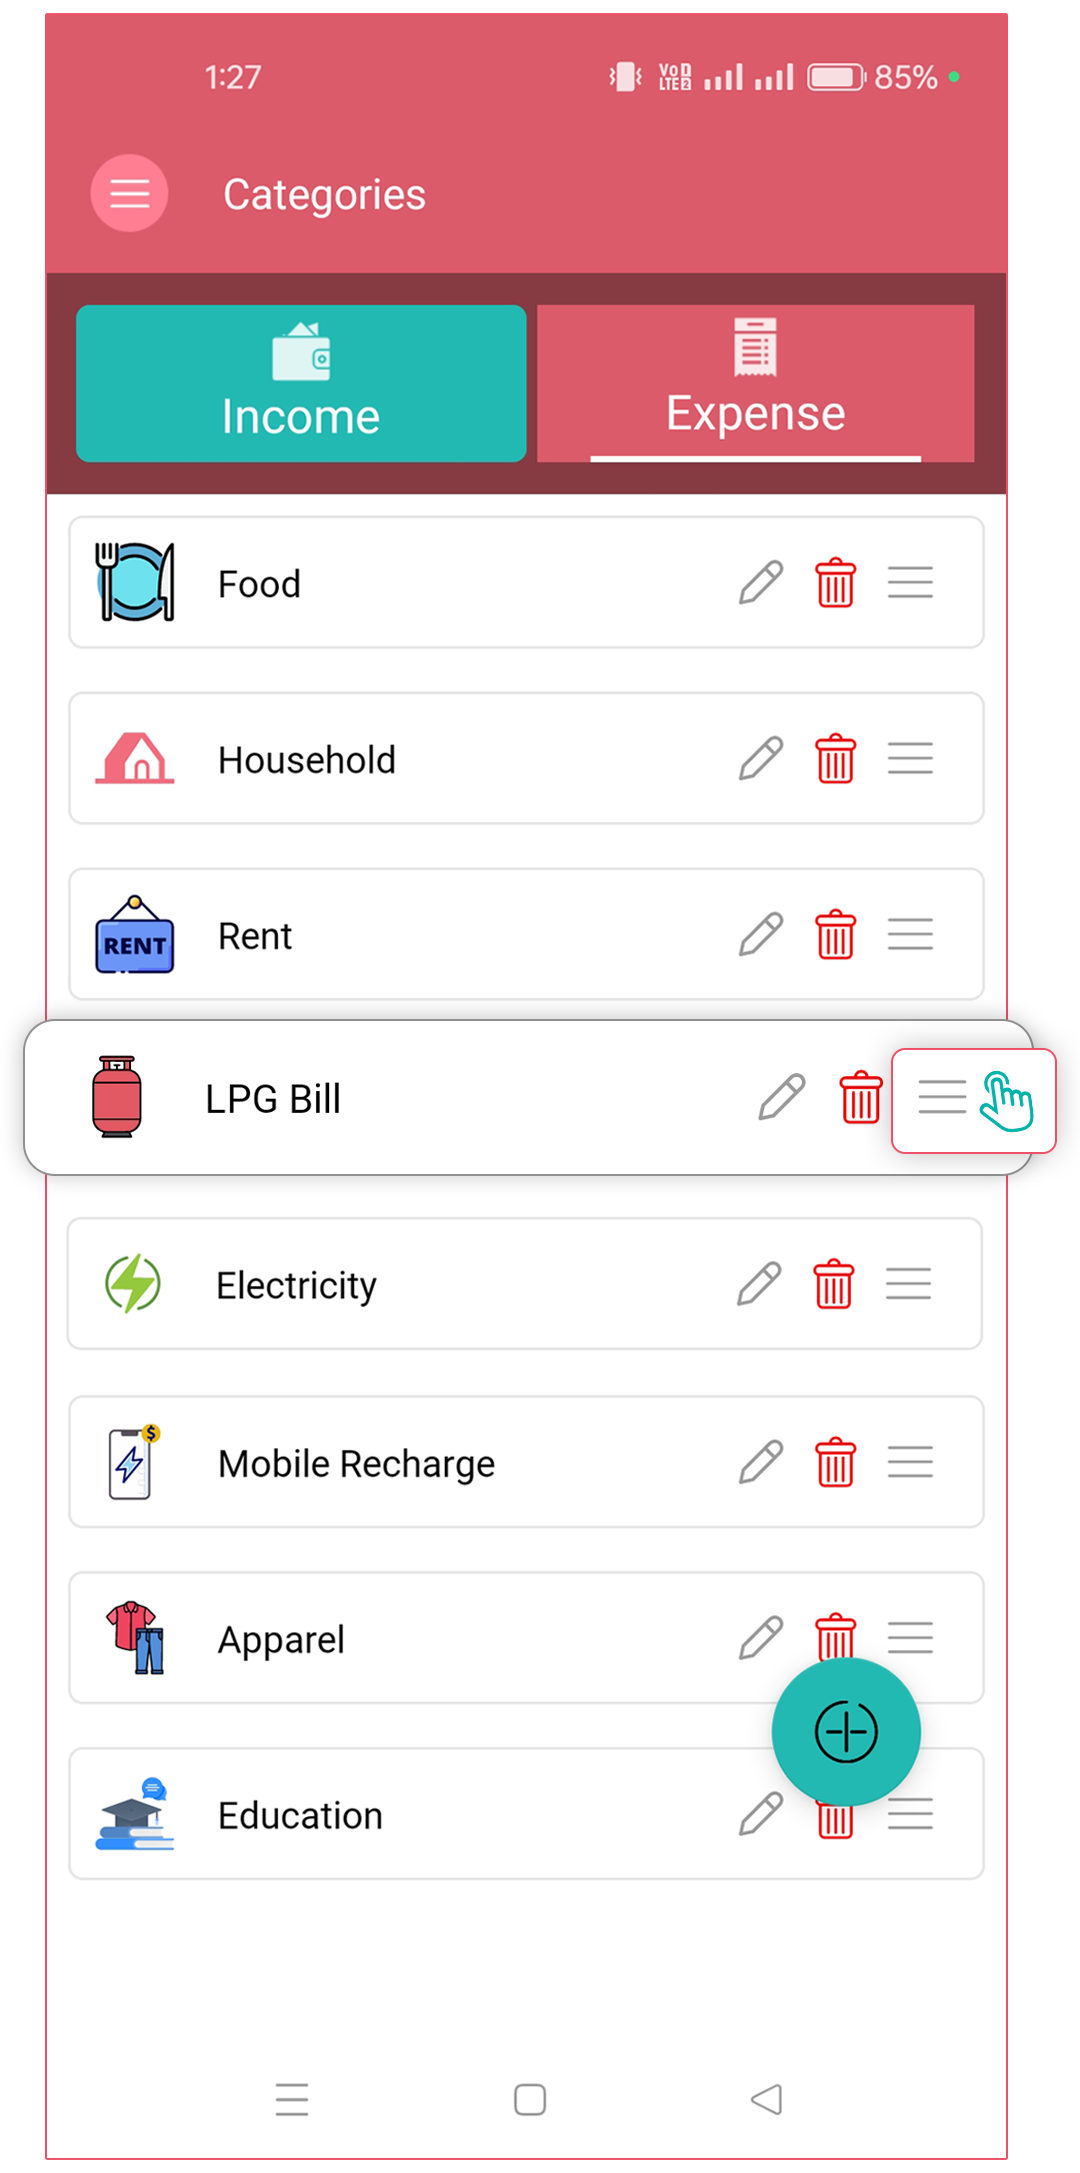
For sorting categories:
- Navigate to the Categories section
- Look for a "Sort" option or a reordering feature (three horizontal lines)
- You may be able to:
- Drag and drop categories to reorder them
- Long press on the “three horizontal lines” and use a finger "Move up" or "Move down" function
How can I set a monthly budget?
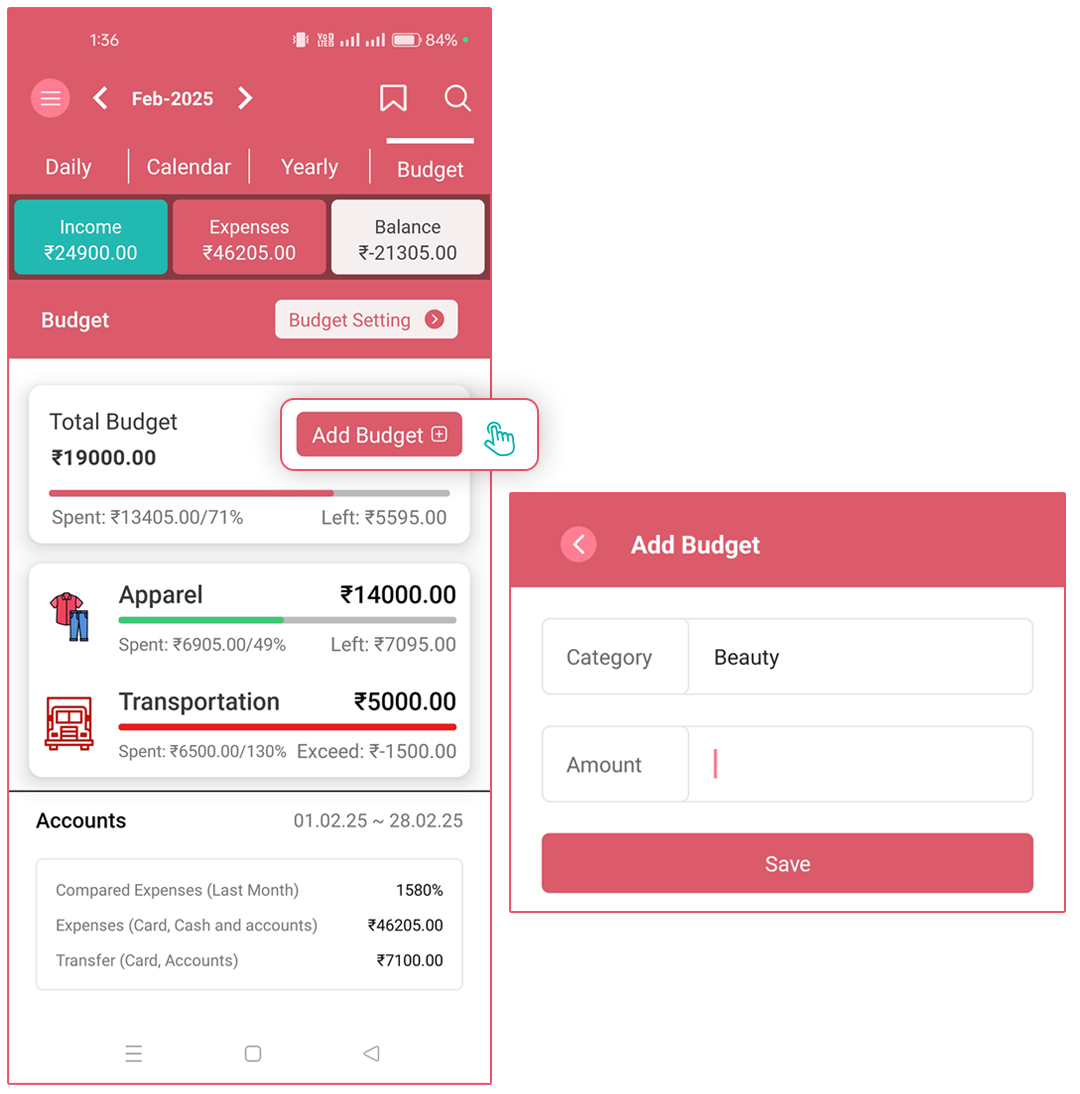
To set a budget for a category:
- to the Transactions screen.
- Tap on the Budget tab (last one on the top).
- Tap Add Budget +.
- Select a Category, enter your monthly Budget Amount, and hit Save. Once saved, it will
appear in the Budget Analysis view. It will start at 0% spent, and as you log expenses for
that category, you'll see:
- Total Budget
- Total Spent
- Amount Exceeded (if any)
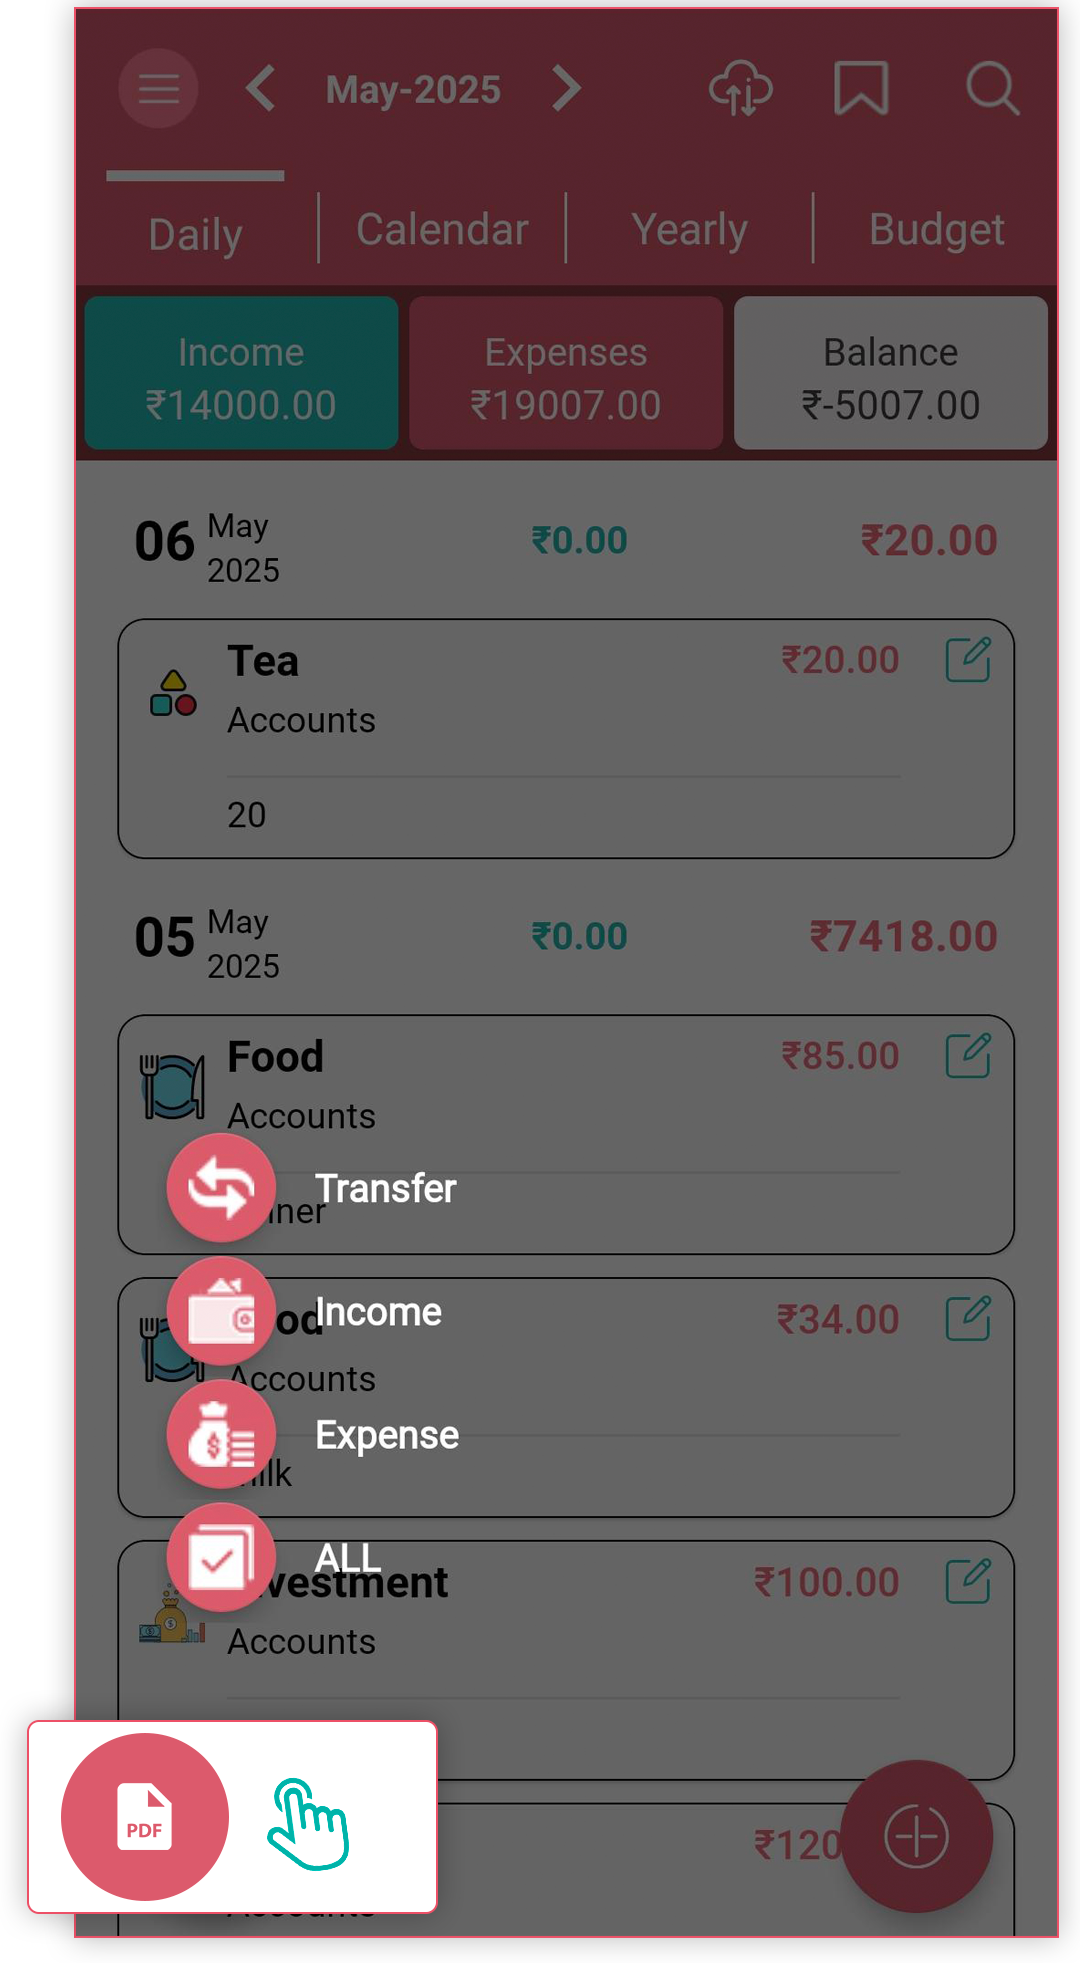
How can I export the Transaction Report as a PDF file?
To export a Transaction Report as PDF:
- Go to the "Transactions" screen
- Select one of these viewing options:
- "Daily" (shows current month entries)
- "Calendar" (shows current month entries)
- "Yearly" (shows the last twelve months' entries)
- Look for the PDF button at the bottom of the page
- After clicking the PDF button, select the type of transactions to include:
- "All" (includes all Income, Expenses, and Transfer entries)
- "Expense" (only expense transactions)
- "Income" (only income transactions)
- "Transfer" (only transfer transactions)
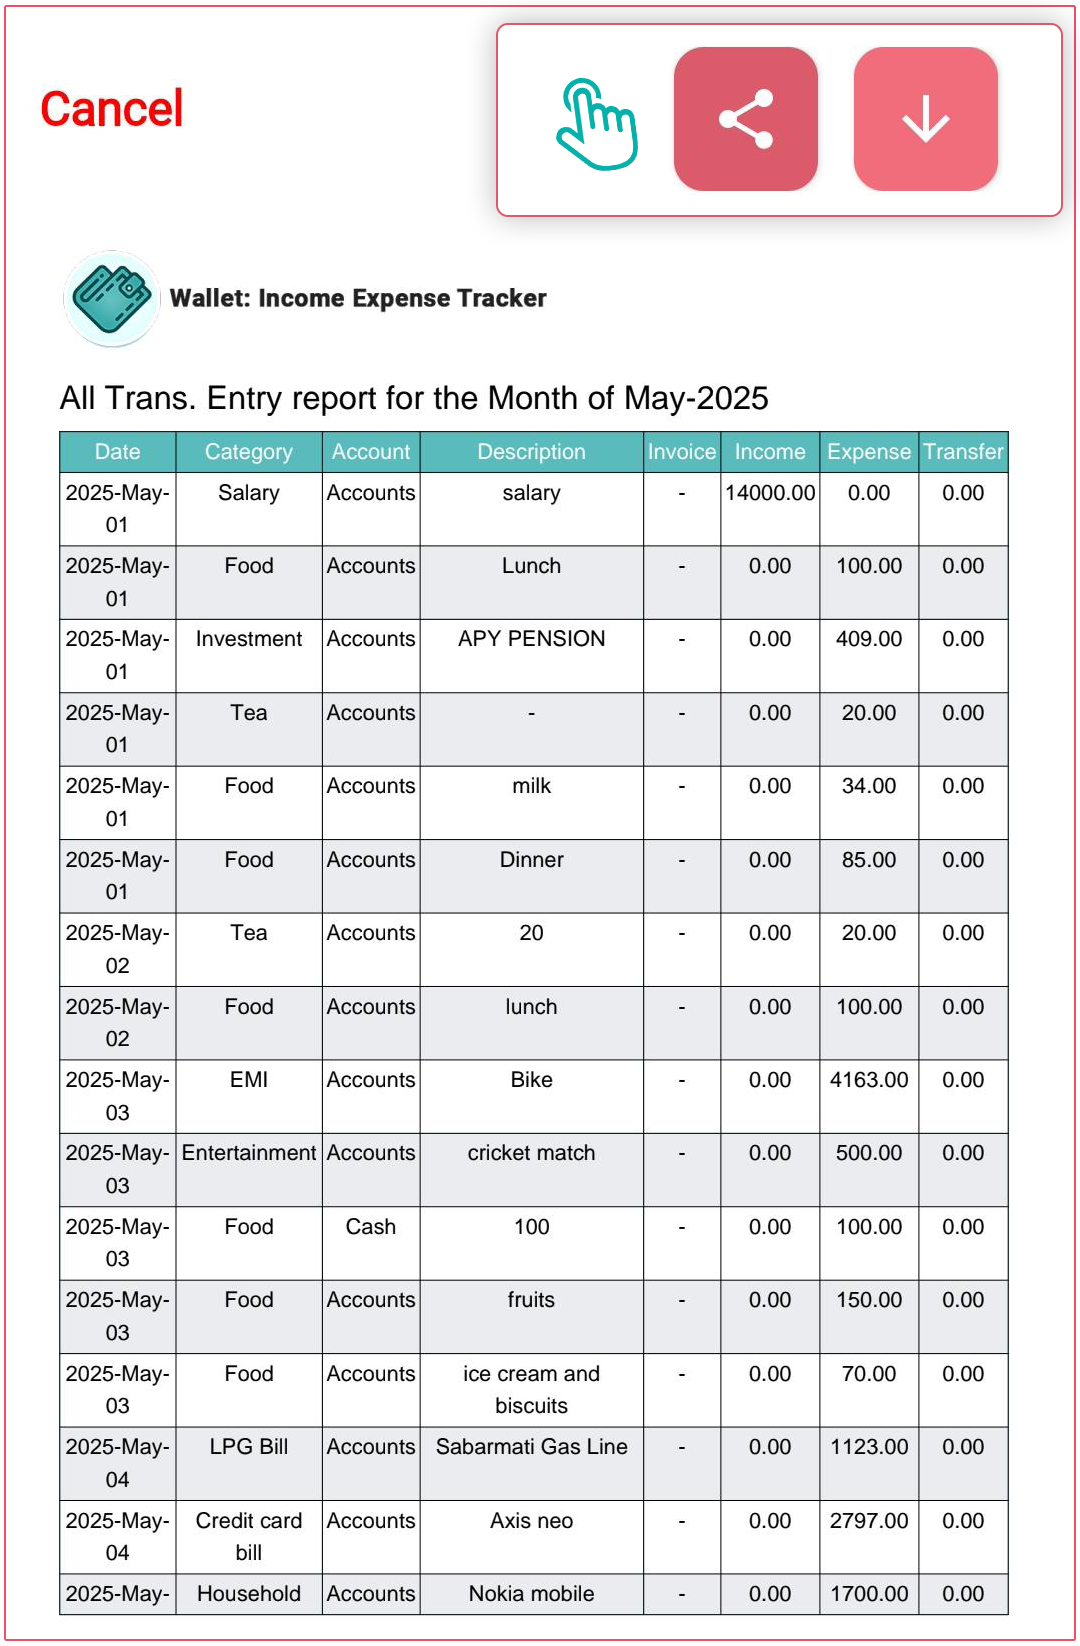
- Select a specific button to export the entries
- Once exported, you can share the PDF through various social media platforms
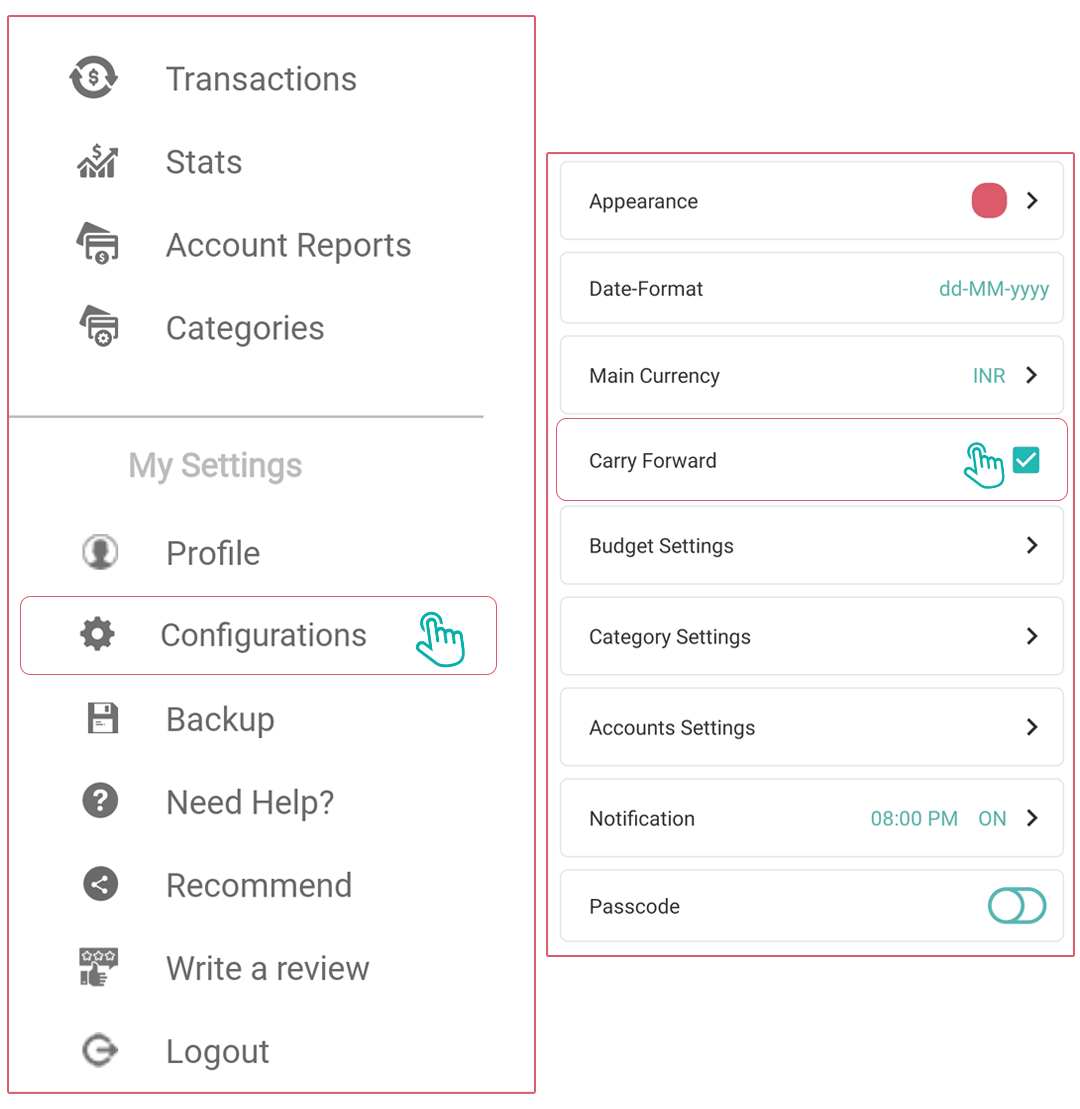
How can I enable/disable the Carry Forward option in the app?
To enable/disable Carry Forward Balance:
- Open the Side Menu
- Navigate to Configurations
- Select Carry Forward
- Toggle the checkbox to enable or disable the feature
When this feature is enabled:
- The Carry Forward Balance appears at the top of the Daily tab on the transactions screen.
- It also displays at the top of the Stats screen.
- It automatically takes the closing balance from the previous month and uses it as the opening balance for the current month.
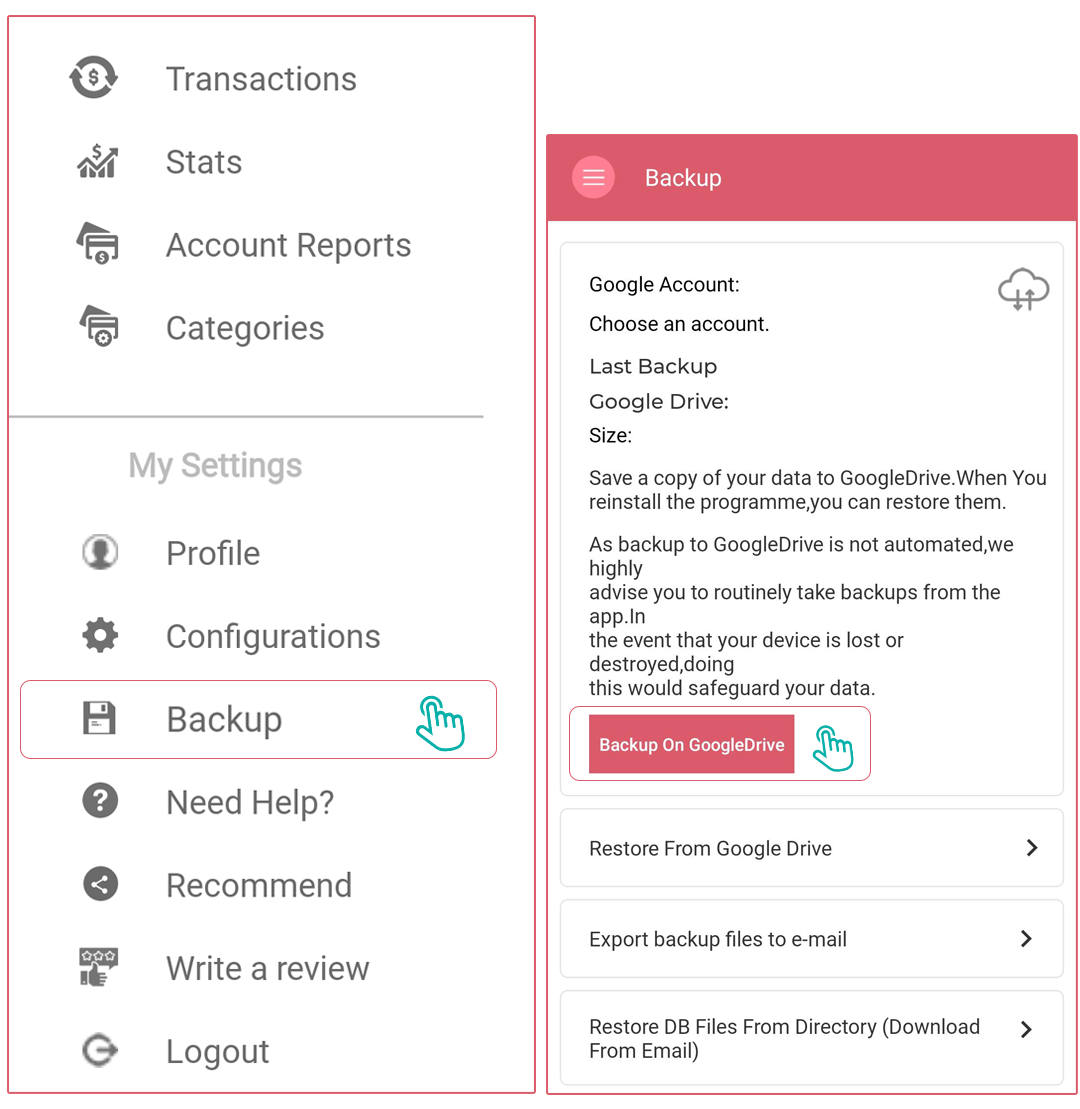
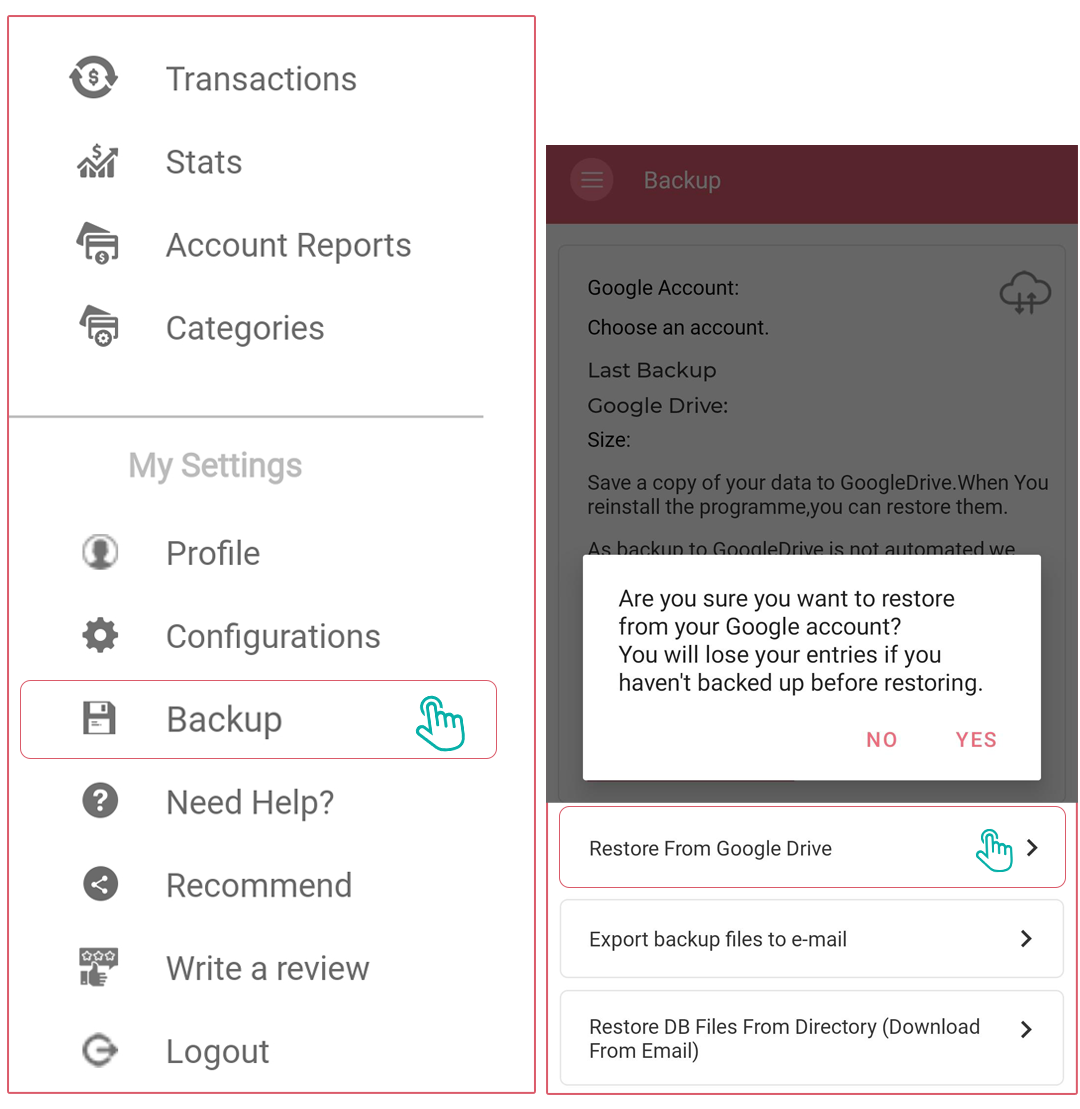
How can I take a backup of my data from the app?
To access backup options:
- Open the Side Menu
- Navigate to Backup
on Google Drive:
- Creates a backup on Google Drive
- You can select which Google Account to use for storing the backup file
- Ideal for Android users and those who regularly use Google services
Back up the database file to email:
- Create a backup file of your current data
- Allow you to send it to your email or any third-party app
- Useful for keeping an offline copy or sharing with another device
Back up on iCloud (iOS users only):
- Creates and stores a backup file on iCloud
- Automatically uses the iCloud account configured on your iPhone
- Designed specifically for Apple iOS users
These backup options give you flexibility in how you protect your financial data and make it accessible across different devices.
How can I restore my data in the app?
To restore a database backup:
- Open the Side Menu
- Navigate to the Backup section
- Look for the restore options
Important prerequisites:
- You must be logged in with the same account used when creating the backup:
- For Android users: the same Google account
- For iOS users: the same Apple ID
Restoration process:
- Android users: Click "Restore from Google Drive" to restore the latest backup
- iOS users: Click "Restore from iCloud" to restore the latest backup. This feature ensures you can recover your financial data if you change devices or experience data loss. Making regular backups is always good practice for protecting your financial information.
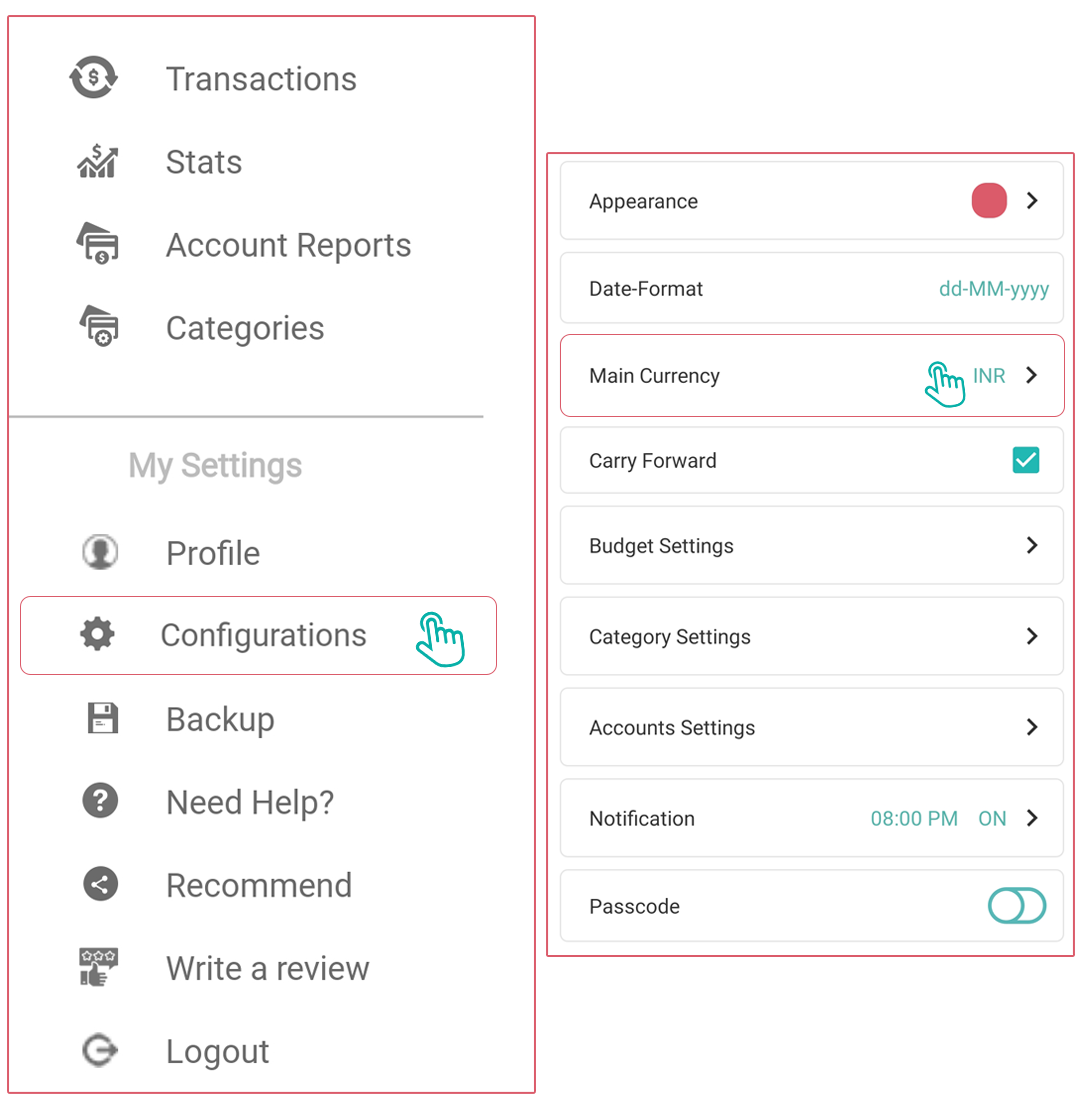
How can I change the currency in the app?
You will change the Currency from the Side Menu. Follow the steps below to change the Currency.
- Tap on Side Menu.
- Choose the Configurations option.
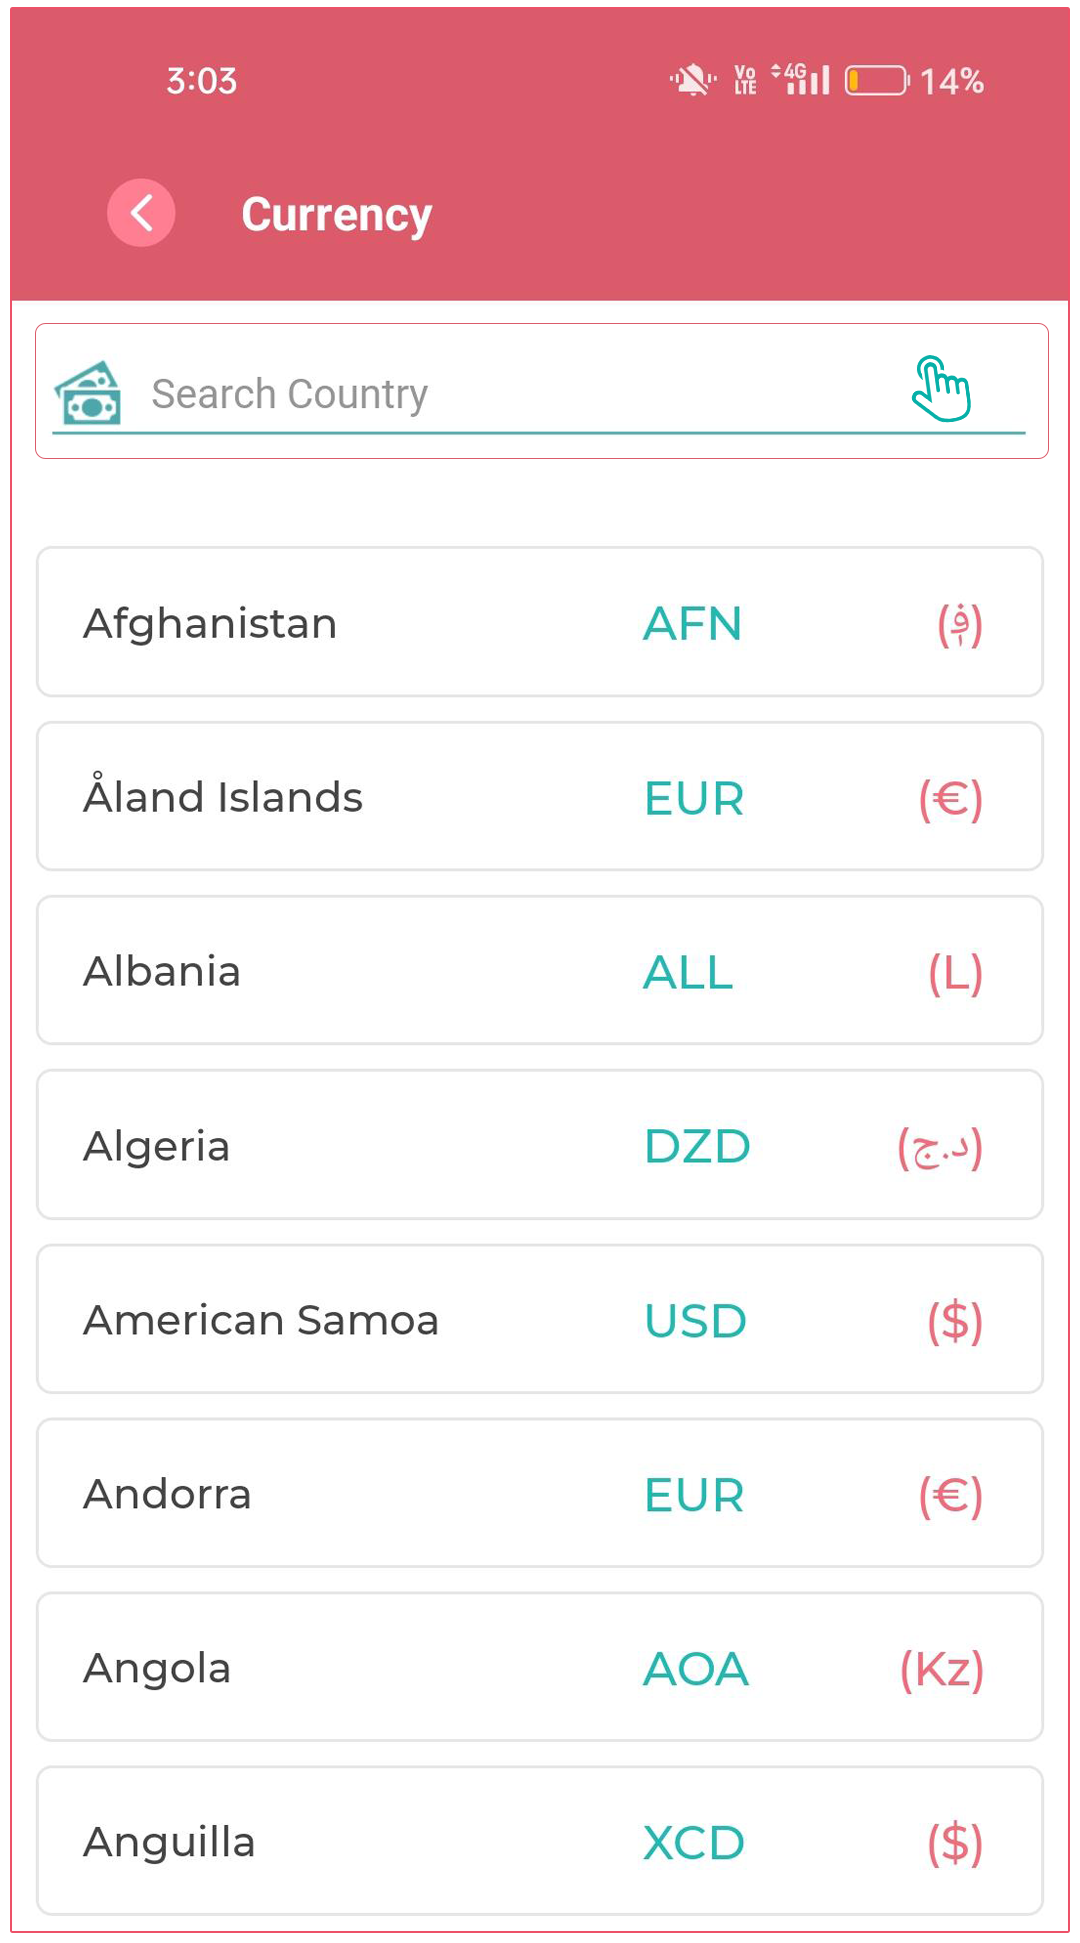
- Choose the Main Currency.
- You can either search or select the Currency that you want to set. Once you select Currency, a pop-up will appear that will ask you, "Are you sure you want to change the currency?" If you select “YES,” then that currency will be reflected as your default currency.
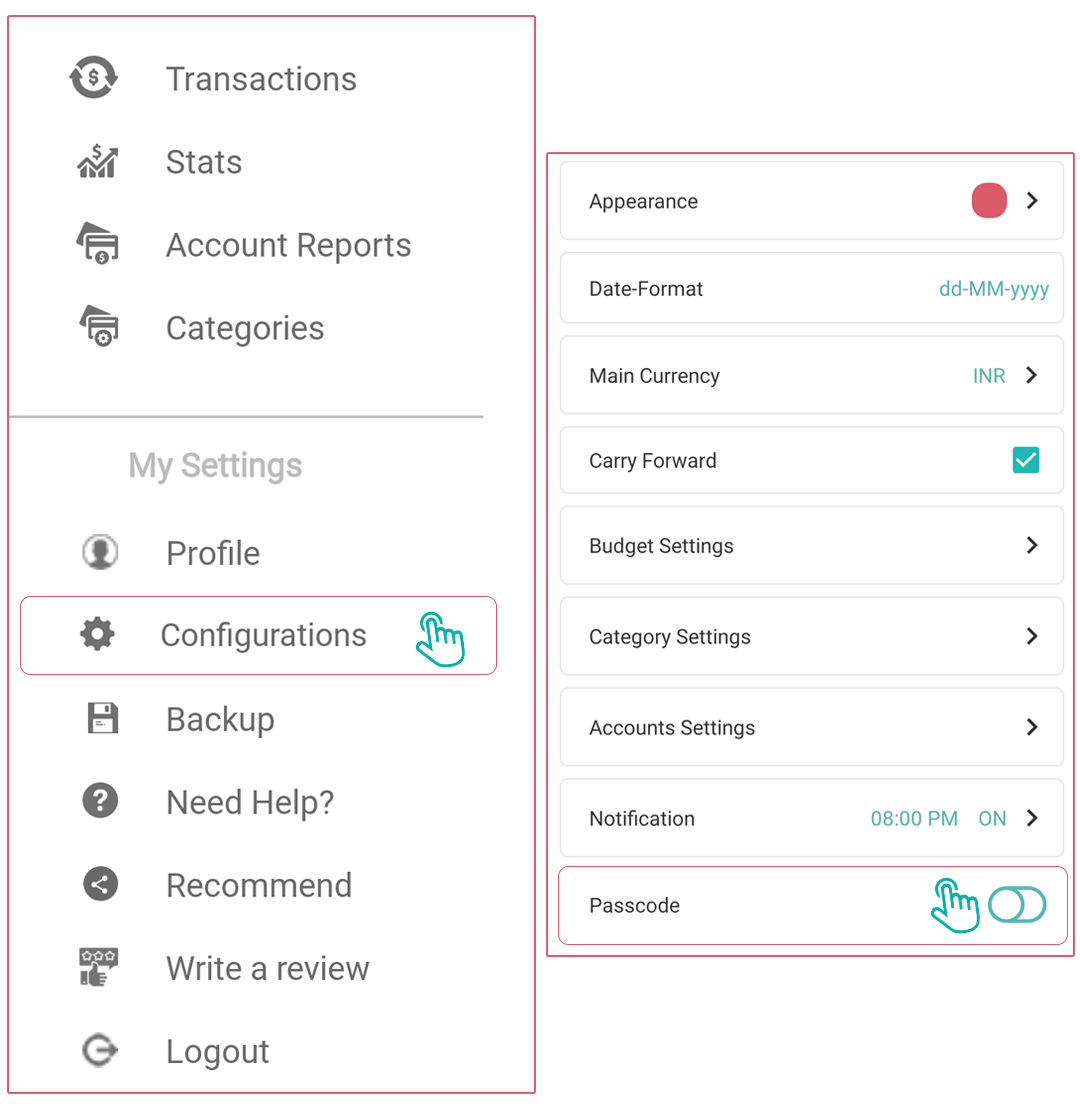
How can I set the passcode?
You can set the Passcode from the Side Menu. You should follow the steps below:
- Tap on Side Menu.
- Choose the Configurations option.
- Choose the Passcode.
- Enter four-digit Passcode. Now, for confirmation, you have to re-enter the Passcode and tap on the Save button.
- Later, you can change the passcode settings anytime in the future and can make it ON/OFF as per your choice.
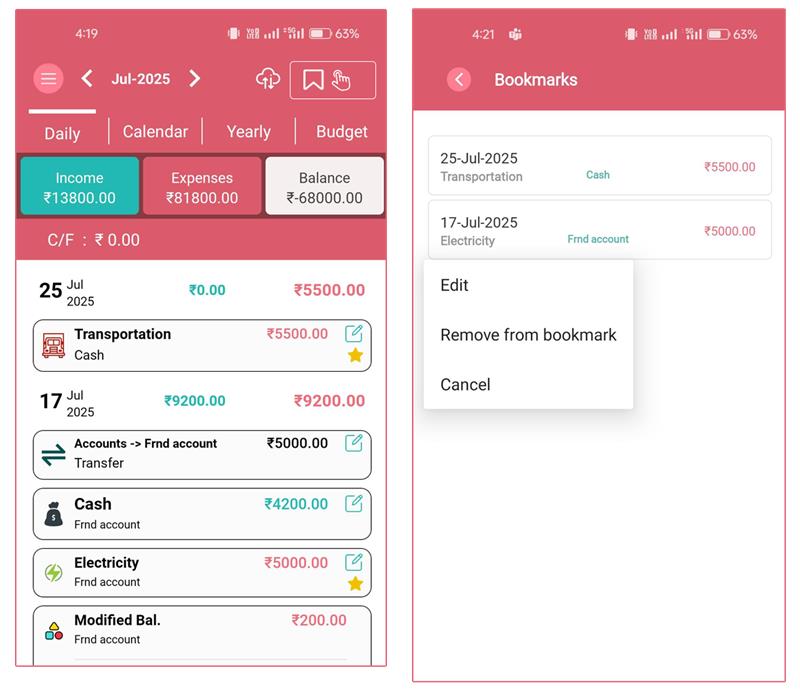
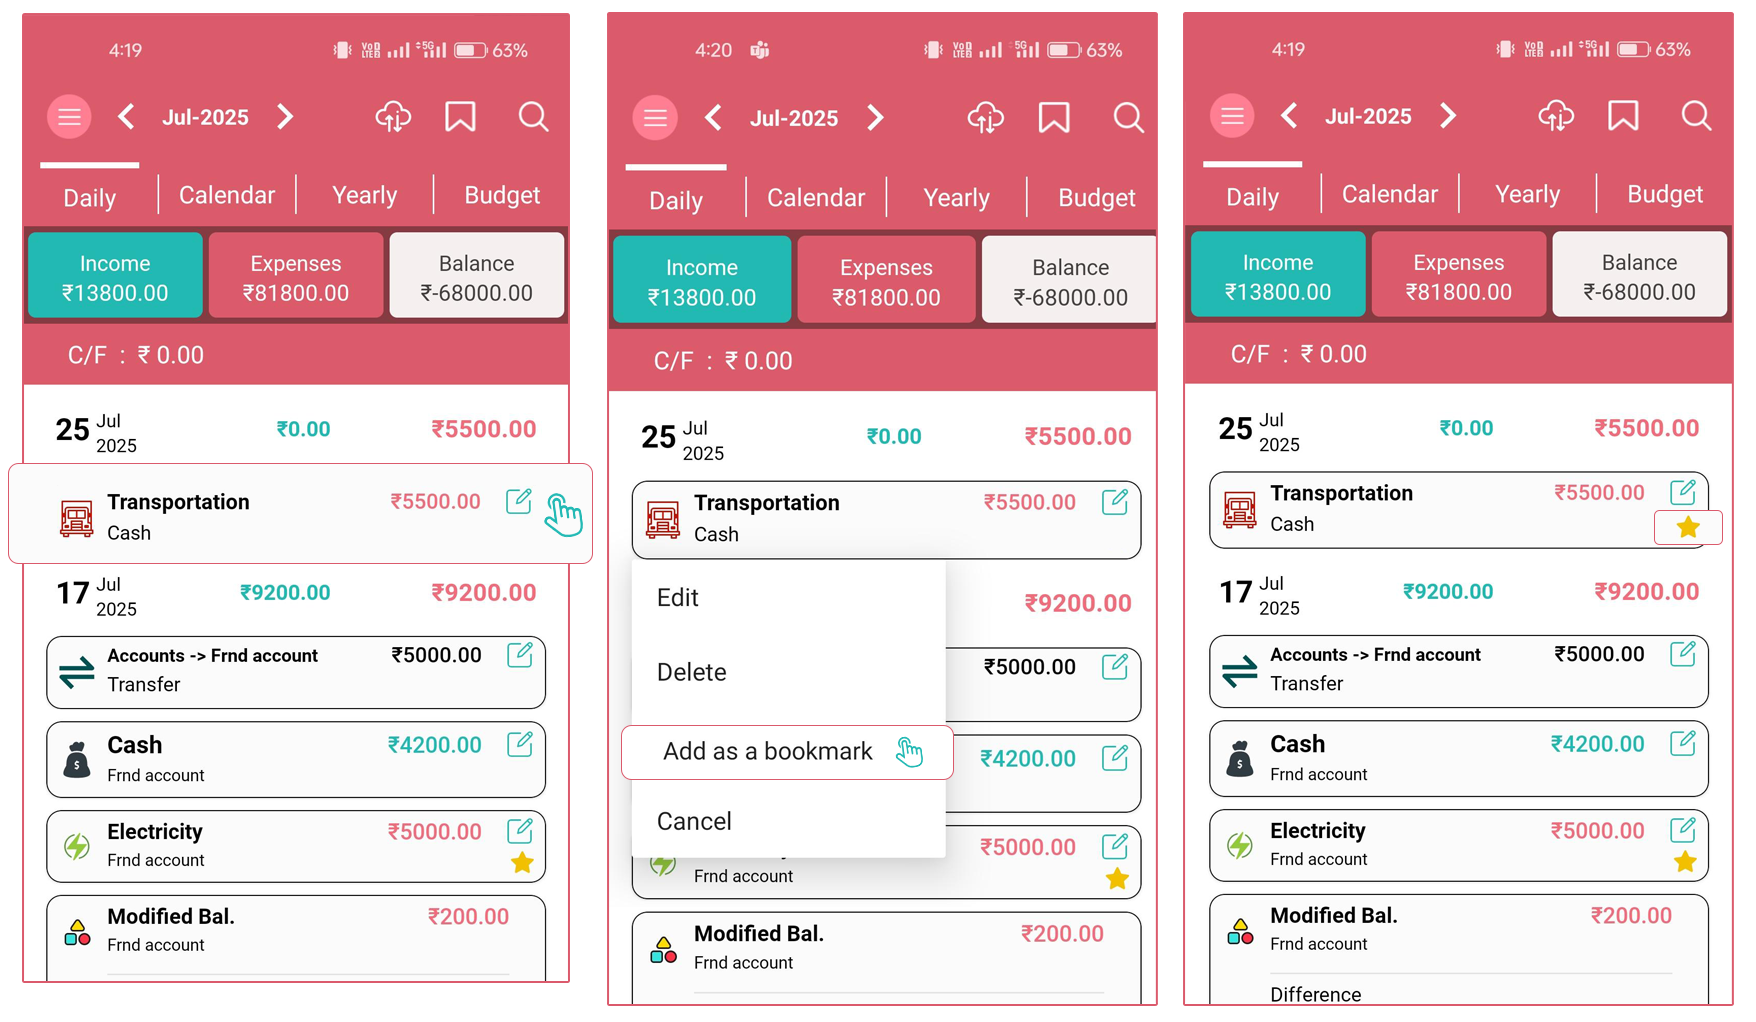
How can I add/remove/view bookmarks?
On the "Daily" list screen, tap on the entry, and it will open the "Pop-up" showing the multiple options. Tap on the "Add as Bookmark" option, and that "entry" will be added to the "bookmark" list. And the "Star" icon will display on the right side of that entry.
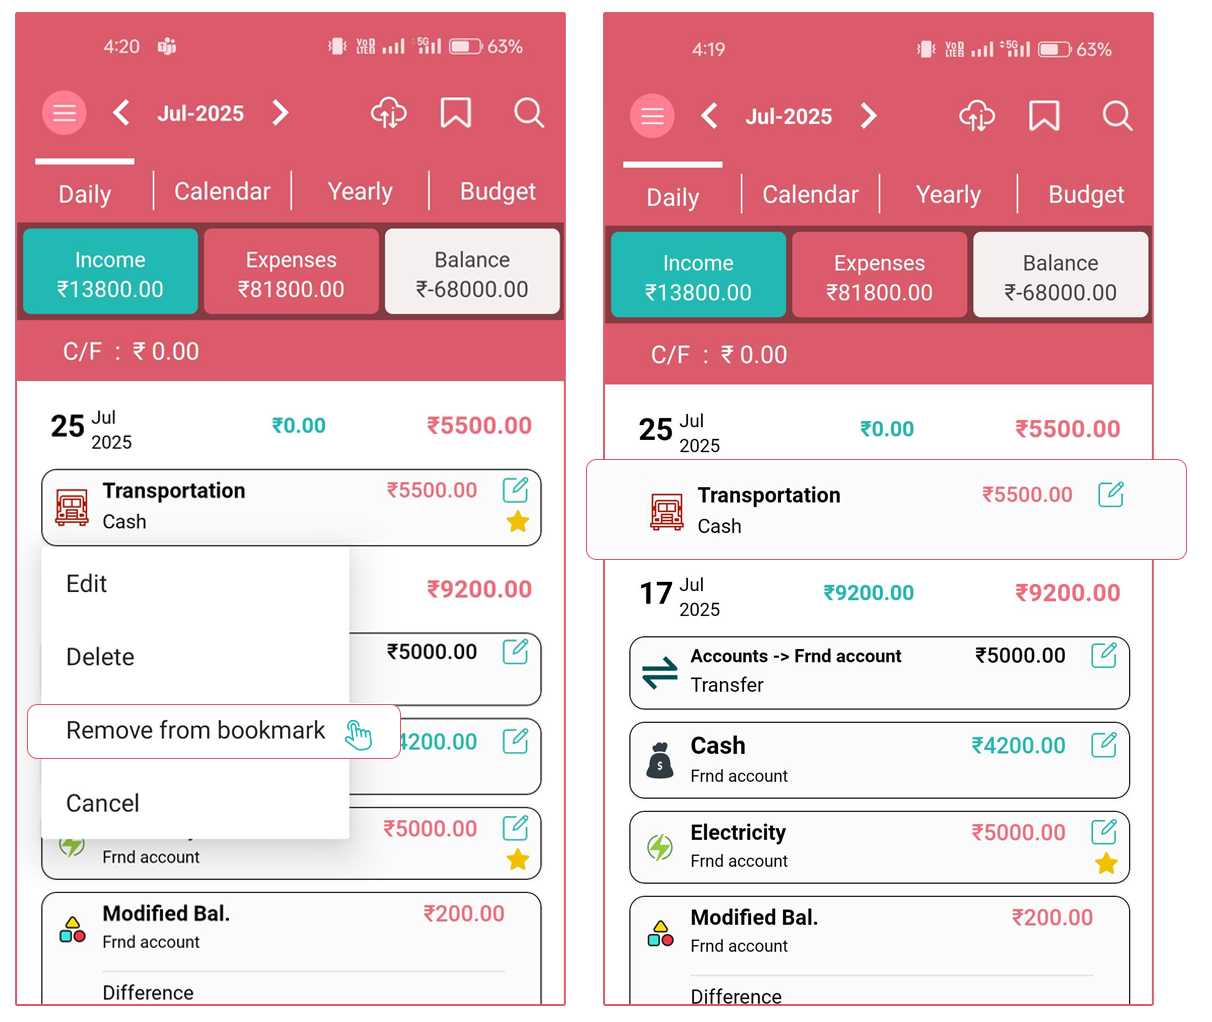
Now, if you want to remove an entry from the "bookmark", tap again on the entry that is already bookmarked. It will open the "Pop-up" with some options.
Tap on the "Remove from bookmark" option. It will remove the entry from the bookmark.
Now, if you want to see all the entries that you "bookmarked" already, then click on the "bookmark" icon on the top bar. It will open the new screen with the title "Bookmarks"